- About MogDB
- Quick Start
- Characteristic Description
- Overview
- High Performance
- CBO Optimizer
- LLVM
- Vectorized Engine
- Hybrid Row-Column Store
- Adaptive Compression
- Adaptive Two-phase Hash Aggregation
- SQL Bypass
- Kunpeng NUMA Architecture Optimization
- High Concurrency of Thread Pools
- SMP for Parallel Execution
- Xlog no Lock Flush
- Parallel Page-based Redo For Ustore
- Row-Store Execution to Vectorized Execution
- Astore Row Level Compression
- BTree Index Compression
- Tracing SQL Function
- Parallel Index Scan
- Parallel Query Optimization
- Enhancement of Tracing Backend Key Thread
- Ordering Operator Optimization
- OCK-accelerated Data Transmission
- OCK SCRLock Accelerate Distributed Lock
- Enhancement of WAL Redo Performance
- Enhancement of Dirty Pages Flushing Performance
- Sequential Scan Prefetch
- Ustore SMP Parallel Scanning
- Statement Level PLSQL Function Cache Support
- High Availability (HA)
- Primary/Standby
- Logical Replication
- Logical Backup
- Physical Backup
- Automatic Job Retry upon Failure
- Ultimate RTO
- High Availability Based on the Paxos Protocol
- Cascaded Standby Server
- Delayed Replay
- Adding or Deleting a Standby Server
- Delaying Entering the Maximum Availability Mode
- Parallel Logical Decoding
- DCF
- CM(Cluster Manager)
- Global SysCache
- Using a Standby Node to Build a Standby Node
- Two City and Three Center DR
- CM Cluster Management Component Supporting Two Node Deployment
- Query of the Original DDL Statement for a View
- MogDB/CM/PTK Dual Network Segment Support
- Enhanced Efficiency of Logical Backup and Restore
- Maintainability
- Workload Diagnosis Report (WDR)
- Slow SQL Diagnosis
- Session Performance Diagnosis
- System KPI-aided Diagnosis
- Fault Diagnosis
- Extension Splitting
- Built-in Stack Tool
- SQL PATCH
- Lightweight Lock Export and Analysis
- DCF Module Tracing
- Error When Writing Illegal Characters
- Support For Pageinspect & Pagehack
- Autonomous Transaction Management View and Termination
- Corrupt Files Handling
- Compatibility
- Add %rowtype Attribute To The View
- Aggregate Functions Distinct Performance Optimization
- Aggregate Functions Support Keep Clause
- Aggregate Functions Support Scenario Extensions
- Compatible With MySQL Alias Support For Single Quotes
- current_date/current_time Keywords As Field Name
- Custom Type Array
- For Update Support Outer Join
- MogDB Supports Insert All
- Oracle DBLink Syntax Compatibility
- Remove Type Conversion Hint When Creating PACKAGE/FUNCTION/PROCEDURE
- Support Bypass Method When Merge Into Hit Index
- Support For Adding Nocopy Attributes To Procedure And Function Parameters
- Support For Passing The Count Attribute Of An Array As A Parameter Of The Array Extend
- Support Q Quote Escape Character
- Support Subtracting Two Date Types To Return Numeric Type
- Support table()
- Support To Keep The Same Name After The End With Oracle
- Support Where Current Of
- Support For Constants In Package As Default Values
- Support PLPGSQL subtype
- Support Synonym Calls Without Parentheses For Function Without Parameters
- Support For dbms_utility.format_error_backtrace
- Support for PIVOT and UNPIVOT Syntax
- Mod Function Compatibility
- Support for Nesting of Aggregate Functions
- ORDER BY/GROUP BY Scenario Expansion
- Support for Modifying Table Log Properties After Table Creation
- Support for INSERT ON CONFLICT Clause
- Support for AUTHID CURRENT_USER
- Support for Stored Procedure OUT Parameters in PBE Mode
- Database Security
- Access Control Model
- Separation of Control and Access Permissions
- Database Encryption Authentication
- Data Encryption and Storage
- Database Audit
- Network Communication Security
- Resource Label
- Unified Audit
- Dynamic Data Anonymization
- Row-Level Access Control
- Password Strength Verification
- Equality Query in a Fully-encrypted Database
- Ledger Database Mechanism
- Transparent Data Encryption
- Enterprise-Level Features
- Support for Functions and Stored Procedures
- SQL Hints
- Full-Text Indexing
- Copy Interface for Error Tolerance
- Partitioning
- Support for Advanced Analysis Functions
- Materialized View
- HyperLogLog
- Creating an Index Online
- Autonomous Transaction
- Global Temporary Table
- Pseudocolumn ROWNUM
- Stored Procedure Debugging
- JDBC Client Load Balancing and Read/Write Isolation
- In-place Update Storage Engine
- Publication-Subscription
- Foreign Key Lock Enhancement
- Data Compression in OLTP Scenarios
- Transaction Async Submit
- Index Creation Parallel Control
- Dynamic Partition Pruning
- COPY Import Optimization
- SQL Running Status Observation
- BRIN Index
- BLOOM Index
- Event Trigger
- Scrollable Cursor Support for Reverse Retrieval
- Support for Pruning Subquery Projection Columns
- Pruning ORDER BY in Subqueries
- Automatic Creation of Indexes Supporting Fuzzy Matching
- Support for Importing and Exporting Specific Objects
- Application Development Interfaces
- AI Capabilities
- Middleware
- Workload Management
- Installation Guide
- Upgrade Guide
- Administrator Guide
- Localization
- Routine Maintenance
- Starting and Stopping MogDB
- Using the gsql Client for Connection
- Routine Maintenance
- Checking OS Parameters
- Checking MogDB Health Status
- Checking Database Performance
- Checking and Deleting Logs
- Checking Time Consistency
- Checking The Number of Application Connections
- Routinely Maintaining Tables
- Routinely Recreating an Index
- Exporting and Viewing the WDR
- Data Security Maintenance Suggestions
- Slow SQL Diagnosis
- Log Reference
- Primary and Standby Management
- Column-store Tables Management
- Backup and Restoration
- Database Deployment Solutions
- Importing and Exporting Data
- High Available Guide
- AI Features Guide
- AI4DB: Autonomous Database O&M
- DBMind Mode
- Components that Support DBMind
- AI Sub-functions of the DBMind
- ABO Optimizer
- DB4AI: Database-driven AI
- AI4DB: Autonomous Database O&M
- Security Guide
- Developer Guide
- Application Development Guide
- Development Specifications
- Development Based on JDBC
- JDBC Package, Driver Class, and Environment Class
- Development Process
- Loading the Driver
- Connecting to a Database
- Connecting to the Database (Using SSL)
- Connecting to the Database (Using UDS)
- Running SQL Statements
- Processing Data in a Result Set
- Closing a Connection
- Managing Logs
- Example: Common Operations
- Example: Retrying SQL Queries for Applications
- Example: Importing and Exporting Data Through Local Files
- Example 2: Migrating Data from a MY Database to MogDB
- Example: Logic Replication Code
- Example: Parameters for Connecting to the Database in Different Scenarios
- Example: JDBC Primary/Standby Cluster Load Balancing
- JDBC API Reference
- java.sql.Connection
- java.sql.CallableStatement
- java.sql.DatabaseMetaData
- java.sql.Driver
- java.sql.PreparedStatement
- java.sql.ResultSet
- java.sql.ResultSetMetaData
- java.sql.Statement
- javax.sql.ConnectionPoolDataSource
- javax.sql.DataSource
- javax.sql.PooledConnection
- javax.naming.Context
- javax.naming.spi.InitialContextFactory
- CopyManager
- JDBC-based Common Parameter Reference
- JDBC Release Notes
- Development Based on ODBC
- Development Based on libpq
- Psycopg2-Based Development
- Commissioning
- Stored Procedure
- User Defined Functions
- PL/pgSQL-SQL Procedural Language
- Scheduled Jobs
- Autonomous Transaction
- Logical Replication
- Extension
- MySQL Compatibility Description
- Dolphin Extension
- Dolphin Overview
- Dolphin Installation
- Dolphin Restrictions
- Dolphin Syntax
- SQL Reference
- Keywords
- Data Types
- Functions and Operators
- Assignment Operators
- Character Processing Functions and Operators
- Arithmetic Functions and Operators
- Dolphin Lock
- Date and Time Processing Functions and Operators
- Advisory Lock Functions
- Network Address Functions and Operators
- Conditional Expression Functions
- Aggregate Functions
- System Information Functions
- Logical Operators
- Bit String Functions and Operators
- JSON-JSONB Functions and Operators
- Type Conversion Functions
- Compatible Operators and Operations
- Comment Operators
- Expressions
- DDL Syntax
- DML Syntax
- DCL Syntax
- SQL Syntax
- ALTER DATABASE
- ALTER FUNCTION
- ALTER PROCEDURE
- ALTER SERVER
- ALTER TABLE
- ALTER TABLE PARTITION
- ALTER TABLESPACE
- ALTER VIEW
- ANALYZE | ANALYSE
- AST
- CHECKSUM TABLE
- CREATE DATABASE
- CREATE FUNCTION
- CREATE INDEX
- CREATE PROCEDURE
- CREATE SERVER
- CREATE TABLE
- CREATE TABLE AS
- CREATE TABLE PARTITION
- CREATE TABLESPACE
- CREATE TRIGGER
- CREATE VIEW
- DESCRIBE TABLE
- DO
- DROP DATABASE
- DROP INDEX
- DROP TABLESPACE
- EXECUTE
- EXPLAIN
- FLUSH BINARY LOGS
- GRANT
- GRANT/REVOKE PROXY
- INSERT
- KILL
- LOAD DATA
- OPTIMIZE TABLE
- PREPARE
- RENAME TABLE
- RENAME USER
- REVOKE
- SELECT
- SELECT HINT
- SET CHARSET
- SET PASSWORD
- SHOW CHARACTER SET
- SHOW COLLATION
- SHOW COLUMNS
- SHOW CREATE DATABASE
- SHOW CREATE FUNCTION
- SHOW CREATE PROCEDURE
- SHOW CREATE TABLE
- SHOW CREATE TRIGGER
- SHOW CREATE VIEW
- SHOW DATABASES
- SHOW FUNCTION STATUS
- SHOW GRANTS
- SHOW INDEX
- SHOW MASTER STATUS
- SHOW PLUGINS
- SHOW PRIVILEGES
- SHOW PROCEDURE STATUS
- SHOW PROCESSLIST
- SHOW SLAVE HOSTS
- SHOW STATUS
- SHOW TABLES
- SHOW TABLE STATUS
- SHOW TRIGGERS
- SHOW VARIABLES
- SHOW WARNINGS/ERRORS
- UPDATE
- USE db_name
- System Views
- GUC Parameters
- Resetting Parameters
- Stored Procedures
- Identifiers
- SQL Reference
- MySQL Syntax Compatibility Assessment Tool
- Dolphin Extension
- Materialized View
- Partition Management
- Application Development Guide
- Performance Tuning Guide
- Reference Guide
- System Catalogs and System Views
- Overview
- Querying a System Catalog
- System Catalogs
- GS_ASP
- GS_AUDITING_POLICY
- GS_AUDITING_POLICY_ACCESS
- GS_AUDITING_POLICY_FILTERS
- GS_AUDITING_POLICY_PRIVILEGES
- GS_CLIENT_GLOBAL_KEYS
- GS_CLIENT_GLOBAL_KEYS_ARGS
- GS_COLUMN_KEYS
- GS_COLUMN_KEYS_ARGS
- GS_DB_PRIVILEGE
- GS_ENCRYPTED_COLUMNS
- GS_ENCRYPTED_PROC
- GS_GLOBAL_CHAIN
- GS_GLOBAL_CONFIG
- GS_MASKING_POLICY
- GS_MASKING_POLICY_ACTIONS
- GS_MASKING_POLICY_FILTERS
- GS_MATVIEW
- GS_MATVIEW_DEPENDENCY
- GS_MODEL_WAREHOUSE
- GS_OPT_MODEL
- GS_PACKAGE
- GS_POLICY_LABEL
- GS_RECYCLEBIN
- GS_TXN_SNAPSHOT
- GS_UID
- GS_WLM_EC_OPERATOR_INFO
- GS_WLM_INSTANCE_HISTORY
- GS_WLM_OPERATOR_INFO
- GS_WLM_PLAN_ENCODING_TABLE
- GS_WLM_PLAN_OPERATOR_INFO
- GS_WLM_SESSION_QUERY_INFO_ALL
- GS_WLM_USER_RESOURCE_HISTORY
- PG_AGGREGATE
- PG_AM
- PG_AMOP
- PG_AMPROC
- PG_APP_WORKLOADGROUP_MAPPING
- PG_ATTRDEF
- PG_ATTRIBUTE
- PG_AUTH_HISTORY
- PG_AUTH_MEMBERS
- PG_AUTHID
- PG_CAST
- PG_CLASS
- PG_COLLATION
- PG_CONSTRAINT
- PG_CONVERSION
- PG_DATABASE
- PG_DB_ROLE_SETTING
- PG_DEFAULT_ACL
- PG_DEPEND
- PG_DESCRIPTION
- PG_DIRECTORY
- PG_ENUM
- PG_EVENT_TRIGGER
- PG_EXTENSION
- PG_EXTENSION_DATA_SOURCE
- PG_FOREIGN_DATA_WRAPPER
- PG_FOREIGN_SERVER
- PG_FOREIGN_TABLE
- PG_HASHBUCKET
- PG_INDEX
- PG_INHERITS
- PG_JOB
- PG_JOB_PROC
- PG_LANGUAGE
- PG_LARGEOBJECT
- PG_LARGEOBJECT_METADATA
- PG_NAMESPACE
- PG_OBJECT
- PG_OPCLASS
- PG_OPERATOR
- PG_OPFAMILY
- PG_PARTITION
- PG_PLTEMPLATE
- PG_PROC
- PG_PUBLICATION
- PG_PUBLICATION_REL
- PG_RANGE
- PG_REPLICATION_ORIGIN
- PG_RESOURCE_POOL
- PG_REWRITE
- PG_RLSPOLICY
- PG_SECLABEL
- PG_SET
- PG_SHDEPEND
- PG_SHDESCRIPTION
- PG_SHSECLABEL
- PG_STATISTIC
- PG_STATISTIC_EXT
- PG_SUBSCRIPTION
- PG_SUBSCRIPTION_REL
- PG_SYNONYM
- PG_TABLESPACE
- PG_TRIGGER
- PG_TS_CONFIG
- PG_TS_CONFIG_MAP
- PG_TS_DICT
- PG_TS_PARSER
- PG_TS_TEMPLATE
- PG_TYPE
- PG_USER_MAPPING
- PG_USER_STATUS
- PG_WORKLOAD_GROUP
- PGXC_CLASS
- PGXC_GROUP
- PGXC_NODE
- PGXC_SLICE
- PLAN_TABLE_DATA
- STATEMENT_HISTORY
- System Views
- GET_GLOBAL_PREPARED_XACTS(Discarded)
- GS_ASYNC_SUBMIT_SESSIONS_STATUS
- GS_AUDITING
- GS_AUDITING_ACCESS
- GS_AUDITING_PRIVILEGE
- GS_CLUSTER_RESOURCE_INFO
- GS_COMPRESSION
- GS_DB_PRIVILEGES
- GS_FILE_STAT
- GS_GSC_MEMORY_DETAIL
- GS_INSTANCE_TIME
- GS_LABELS
- GS_LSC_MEMORY_DETAIL
- GS_MASKING
- GS_MATVIEWS
- GS_OS_RUN_INFO
- GS_REDO_STAT
- GS_SESSION_CPU_STATISTICS
- GS_SESSION_MEMORY
- GS_SESSION_MEMORY_CONTEXT
- GS_SESSION_MEMORY_DETAIL
- GS_SESSION_MEMORY_STATISTICS
- GS_SESSION_STAT
- GS_SESSION_TIME
- GS_SHARED_MEMORY_DETAIL
- GS_SQL_COUNT
- GS_STAT_SESSION_CU
- GS_THREAD_MEMORY_CONTEXT
- GS_TOTAL_MEMORY_DETAIL
- GS_WLM_CGROUP_INFO
- GS_WLM_EC_OPERATOR_STATISTICS
- GS_WLM_OPERATOR_HISTORY
- GS_WLM_OPERATOR_STATISTICS
- GS_WLM_PLAN_OPERATOR_HISTORY
- GS_WLM_REBUILD_USER_RESOURCE_POOL
- GS_WLM_RESOURCE_POOL
- GS_WLM_SESSION_HISTORY
- GS_WLM_SESSION_INFO
- GS_WLM_SESSION_INFO_ALL
- GS_WLM_SESSION_STATISTICS
- GS_WLM_USER_INFO
- IOS_STATUS
- MPP_TABLES
- PG_AVAILABLE_EXTENSION_VERSIONS
- PG_AVAILABLE_EXTENSIONS
- PG_COMM_DELAY
- PG_COMM_RECV_STREAM
- PG_COMM_SEND_STREAM
- PG_COMM_STATUS
- PG_CONTROL_GROUP_CONFIG
- PG_CURSORS
- PG_EXT_STATS
- PG_GET_INVALID_BACKENDS
- PG_GET_SENDERS_CATCHUP_TIME
- PG_GROUP
- PG_GTT_ATTACHED_PIDS
- PG_GTT_RELSTATS
- PG_GTT_STATS
- PG_INDEXES
- PG_LOCKS
- PG_NODE_ENV
- PG_OS_THREADS
- PG_PREPARED_STATEMENTS
- PG_PREPARED_XACTS
- PG_PUBLICATION_TABLES
- PG_REPLICATION_ORIGIN_STATUS
- PG_REPLICATION_SLOTS
- PG_RLSPOLICIES
- PG_ROLES
- PG_RULES
- PG_RUNNING_XACTS
- PG_SECLABELS
- PG_SESSION_IOSTAT
- PG_SESSION_WLMSTAT
- PG_SETTINGS
- PG_SHADOW
- PG_STAT_ACTIVITY
- PG_STAT_ACTIVITY_NG
- PG_STAT_ALL_INDEXES
- PG_STAT_ALL_TABLES
- PG_STAT_BAD_BLOCK
- PG_STAT_BGWRITER
- PG_STAT_DATABASE
- PG_STAT_DATABASE_CONFLICTS
- PG_STAT_REPLICATION
- PG_STAT_SUBSCRIPTION
- PG_STAT_SYS_INDEXES
- PG_STAT_SYS_TABLES
- PG_STAT_USER_FUNCTIONS
- PG_STAT_USER_INDEXES
- PG_STAT_USER_TABLES
- PG_STAT_XACT_ALL_TABLES
- PG_STAT_XACT_SYS_TABLES
- PG_STAT_XACT_USER_FUNCTIONS
- PG_STAT_XACT_USER_TABLES
- PG_STATIO_ALL_INDEXES
- PG_STATIO_ALL_SEQUENCES
- PG_STATIO_ALL_TABLES
- PG_STATIO_SYS_INDEXES
- PG_STATIO_SYS_SEQUENCES
- PG_STATIO_SYS_TABLES
- PG_STATIO_USER_INDEXES
- PG_STATIO_USER_SEQUENCES
- PG_STATIO_USER_TABLES
- PG_STATS
- PG_TABLES
- PG_TDE_INFO
- PG_THREAD_WAIT_STATUS
- PG_TIMEZONE_ABBREVS
- PG_TIMEZONE_NAMES
- PG_TOTAL_MEMORY_DETAIL
- PG_TOTAL_USER_RESOURCE_INFO
- PG_TOTAL_USER_RESOURCE_INFO_OID
- PG_USER
- PG_USER_MAPPINGS
- PG_VARIABLE_INFO
- PG_VIEWS
- PG_WLM_STATISTICS
- PGXC_PREPARED_XACTS
- PLAN_TABLE
- PATCH_INFORMATION_TABLE
- Functions and Operators
- Logical Operators
- Comparison Operators
- Character Processing Functions and Operators
- Binary String Functions and Operators
- Bit String Functions and Operators
- Mode Matching Operators
- Mathematical Functions and Operators
- Date and Time Processing Functions and Operators
- Type Conversion Functions
- Geometric Functions and Operators
- Network Address Functions and Operators
- Text Search Functions and Operators
- JSON/JSONB Functions and Operators
- HLL Functions and Operators
- SEQUENCE Functions
- Array Functions and Operators
- Range Functions and Operators
- Aggregate Functions
- Window Functions(Analysis Functions)
- Security Functions
- Ledger Database Functions
- Encrypted Equality Functions
- Set Returning Functions
- Conditional Expression Functions
- System Information Functions
- System Administration Functions
- Configuration Settings Functions
- Universal File Access Functions
- Server Signal Functions
- Backup and Restoration Control Functions
- Snapshot Synchronization Functions
- Database Object Functions
- Advisory Lock Functions
- Logical Replication Functions
- Segment-Page Storage Functions
- Other Functions
- Undo System Functions
- Row-store Compression System Functions
- Statistics Information Functions
- Trigger Functions
- Event Trigger Functions
- Hash Function
- Prompt Message Function
- Global Temporary Table Functions
- Fault Injection System Function
- AI Feature Functions
- Dynamic Data Masking Functions
- Other System Functions
- Internal Functions
- Global SysCache Feature Functions
- Data Damage Detection and Repair Functions
- XML Functions
- Obsolete Functions
- Supported Data Types
- SQL Syntax
- ABORT
- ALTER AGGREGATE
- ALTER AUDIT POLICY
- ALTER DATABASE
- ALTER DATA SOURCE
- ALTER DEFAULT PRIVILEGES
- ALTER DIRECTORY
- ALTER EVENT
- ALTER EVENT TRIGGER
- ALTER EXTENSION
- ALTER FOREIGN DATA WRAPPER
- ALTER FOREIGN TABLE
- ALTER FUNCTION
- ALTER GLOBAL CONFIGURATION
- ALTER GROUP
- ALTER INDEX
- ALTER LANGUAGE
- ALTER LARGE OBJECT
- ALTER MASKING POLICY
- ALTER MATERIALIZED VIEW
- ALTER OPERATOR
- ALTER PACKAGE
- ALTER PROCEDURE
- ALTER PUBLICATION
- ALTER RESOURCE LABEL
- ALTER RESOURCE POOL
- ALTER ROLE
- ALTER ROW LEVEL SECURITY POLICY
- ALTER RULE
- ALTER SCHEMA
- ALTER SEQUENCE
- ALTER SERVER
- ALTER SESSION
- ALTER SUBSCRIPTION
- ALTER SYNONYM
- ALTER SYSTEM KILL SESSION
- ALTER SYSTEM SET
- ALTER TABLE
- ALTER TABLE PARTITION
- ALTER TABLE SUBPARTITION
- ALTER TABLESPACE
- ALTER TEXT SEARCH CONFIGURATION
- ALTER TEXT SEARCH DICTIONARY
- ALTER TRIGGER
- ALTER TYPE
- ALTER USER
- ALTER USER MAPPING
- ALTER VIEW
- ANALYZE | ANALYSE
- BEGIN
- CALL
- CHECKPOINT
- CLEAN CONNECTION
- CLOSE
- CLUSTER
- COMMENT
- COMMIT | END
- COMMIT PREPARED
- CONNECT BY
- COPY
- CREATE AGGREGATE
- CREATE AUDIT POLICY
- CREATE CAST
- CREATE CLIENT MASTER KEY
- CREATE COLUMN ENCRYPTION KEY
- CREATE DATABASE
- CREATE DATA SOURCE
- CREATE DIRECTORY
- CREATE EVENT
- CREATE EVENT TRIGGER
- CREATE EXTENSION
- CREATE FOREIGN DATA WRAPPER
- CREATE FOREIGN TABLE
- CREATE FUNCTION
- CREATE GROUP
- CREATE INCREMENTAL MATERIALIZED VIEW
- CREATE INDEX
- CREATE LANGUAGE
- CREATE MASKING POLICY
- CREATE MATERIALIZED VIEW
- CREATE MODEL
- CREATE OPERATOR
- CREATE PACKAGE
- CREATE PROCEDURE
- CREATE PUBLICATION
- CREATE RESOURCE LABEL
- CREATE RESOURCE POOL
- CREATE ROLE
- CREATE ROW LEVEL SECURITY POLICY
- CREATE RULE
- CREATE SCHEMA
- CREATE SEQUENCE
- CREATE SERVER
- CREATE SUBSCRIPTION
- CREATE SYNONYM
- CREATE TABLE
- CREATE TABLE AS
- CREATE TABLE PARTITION
- CREATE TABLESPACE
- CREATE TABLE SUBPARTITION
- CREATE TEXT SEARCH CONFIGURATION
- CREATE TEXT SEARCH DICTIONARY
- CREATE TRIGGER
- CREATE TYPE
- CREATE USER
- CREATE USER MAPPING
- CREATE VIEW
- CREATE WEAK PASSWORD DICTIONARY
- CURSOR
- DEALLOCATE
- DECLARE
- DELETE
- DELIMITER
- DO
- DROP AGGREGATE
- DROP AUDIT POLICY
- DROP CAST
- DROP CLIENT MASTER KEY
- DROP COLUMN ENCRYPTION KEY
- DROP DATABASE
- DROP DATA SOURCE
- DROP DIRECTORY
- DROP EVENT
- DROP EVENT TRIGGER
- DROP EXTENSION
- DROP FOREIGN DATA WRAPPER
- DROP FOREIGN TABLE
- DROP FUNCTION
- DROP GLOBAL CONFIGURATION
- DROP GROUP
- DROP INDEX
- DROP LANGUAGE
- DROP MASKING POLICY
- DROP MATERIALIZED VIEW
- DROP MODEL
- DROP OPERATOR
- DROP OWNED
- DROP PACKAGE
- DROP PROCEDURE
- DROP PUBLICATION
- DROP RESOURCE LABEL
- DROP RESOURCE POOL
- DROP ROLE
- DROP ROW LEVEL SECURITY POLICY
- DROP RULE
- DROP SCHEMA
- DROP SEQUENCE
- DROP SERVER
- DROP SUBSCRIPTION
- DROP SYNONYM
- DROP TABLE
- DROP TABLESPACE
- DROP TEXT SEARCH CONFIGURATION
- DROP TEXT SEARCH DICTIONARY
- DROP TRIGGER
- DROP TYPE
- DROP USER
- DROP USER MAPPING
- DROP VIEW
- DROP WEAK PASSWORD DICTIONARY
- EXECUTE
- EXECUTE DIRECT
- EXPLAIN
- EXPLAIN PLAN
- FETCH
- GRANT
- INSERT
- LOCK
- MERGE INTO
- MOVE
- PREDICT BY
- PREPARE
- PREPARE TRANSACTION
- PURGE
- REASSIGN OWNED
- REFRESH INCREMENTAL MATERIALIZED VIEW
- REFRESH MATERIALIZED VIEW
- REINDEX
- RELEASE SAVEPOINT
- RESET
- REVOKE
- ROLLBACK
- ROLLBACK PREPARED
- ROLLBACK TO SAVEPOINT
- SAVEPOINT
- SELECT
- SELECT INTO
- SET
- SET CONSTRAINTS
- SET ROLE
- SET SESSION AUTHORIZATION
- SET TRANSACTION
- SHOW
- SHOW EVENTS
- SHRINK
- SHUTDOWN
- SNAPSHOT
- START TRANSACTION
- TIMECAPSULE TABLE
- TRUNCATE
- UPDATE
- VACUUM
- VALUES
- SQL Reference
- MogDB SQL
- Keywords
- Constant and Macro
- Expressions
- Type Conversion
- Full Text Search
- System Operation
- DDL Syntax Overview
- DML Syntax Overview
- DCL Syntax Overview
- Subquery
- LLVM
- Alias
- Lock
- Transaction
- Ordinary Table
- Partitioned Table
- Index
- Constraints
- Cursors
- Anonymous Block
- Trigger
- INSERT_RIGHT_REF_DEFAULT_VALUE
- Appendix
- GUC Parameters
- GUC Parameter Usage
- GUC Parameter List
- File Location
- Connection and Authentication
- Resource Consumption
- Write Ahead Log
- HA Replication
- Query Planning
- Error Reporting and Logging
- Alarm Detection
- Statistics During the Database Running
- Load Management
- Automatic Vacuuming
- Default Settings of Client Connection
- Lock Management
- Version and Platform Compatibility
- Faut Tolerance
- Connection Pool Parameters
- MogDB Transaction
- Replication Parameters of Two Database Instances
- Developer Options
- Auditing
- CM Parameters
- Backend Compression
- Upgrade Parameters
- Miscellaneous Parameters
- Wait Events
- Query
- System Performance Snapshot
- Security Configuration
- Global Temporary Table
- HyperLogLog
- Scheduled Task
- Thread Pool
- User-defined Functions
- Backup and Restoration
- DCF Parameters Settings
- Flashback
- Rollback Parameters
- Reserved Parameters
- AI Features
- Global SysCache Parameters
- Multi-Level Cache Management Parameters
- Resource Pooling Parameters
- Parameters Related to Efficient Data Compression Algorithms
- Writer Statement Parameters Supported by Standby Servers
- Data Import and Export
- Delimiter
- Appendix
- Schema
- Information Schema
- DBE_PERF
- OS
- Instance
- Memory
- File
- Object
- STAT_USER_TABLES
- SUMMARY_STAT_USER_TABLES
- GLOBAL_STAT_USER_TABLES
- STAT_USER_INDEXES
- SUMMARY_STAT_USER_INDEXES
- GLOBAL_STAT_USER_INDEXES
- STAT_SYS_TABLES
- SUMMARY_STAT_SYS_TABLES
- GLOBAL_STAT_SYS_TABLES
- STAT_SYS_INDEXES
- SUMMARY_STAT_SYS_INDEXES
- GLOBAL_STAT_SYS_INDEXES
- STAT_ALL_TABLES
- SUMMARY_STAT_ALL_TABLES
- GLOBAL_STAT_ALL_TABLES
- STAT_ALL_INDEXES
- SUMMARY_STAT_ALL_INDEXES
- GLOBAL_STAT_ALL_INDEXES
- STAT_DATABASE
- SUMMARY_STAT_DATABASE
- GLOBAL_STAT_DATABASE
- STAT_DATABASE_CONFLICTS
- SUMMARY_STAT_DATABASE_CONFLICTS
- GLOBAL_STAT_DATABASE_CONFLICTS
- STAT_XACT_ALL_TABLES
- SUMMARY_STAT_XACT_ALL_TABLES
- GLOBAL_STAT_XACT_ALL_TABLES
- STAT_XACT_SYS_TABLES
- SUMMARY_STAT_XACT_SYS_TABLES
- GLOBAL_STAT_XACT_SYS_TABLES
- STAT_XACT_USER_TABLES
- SUMMARY_STAT_XACT_USER_TABLES
- GLOBAL_STAT_XACT_USER_TABLES
- STAT_XACT_USER_FUNCTIONS
- SUMMARY_STAT_XACT_USER_FUNCTIONS
- GLOBAL_STAT_XACT_USER_FUNCTIONS
- STAT_BAD_BLOCK
- SUMMARY_STAT_BAD_BLOCK
- GLOBAL_STAT_BAD_BLOCK
- STAT_USER_FUNCTIONS
- SUMMARY_STAT_USER_FUNCTIONS
- GLOBAL_STAT_USER_FUNCTIONS
- Workload
- Session/Thread
- SESSION_STAT
- GLOBAL_SESSION_STAT
- SESSION_TIME
- GLOBAL_SESSION_TIME
- SESSION_MEMORY
- GLOBAL_SESSION_MEMORY
- SESSION_MEMORY_DETAIL
- GLOBAL_SESSION_MEMORY_DETAIL
- SESSION_STAT_ACTIVITY
- GLOBAL_SESSION_STAT_ACTIVITY
- THREAD_WAIT_STATUS
- GLOBAL_THREAD_WAIT_STATUS
- LOCAL_THREADPOOL_STATUS
- GLOBAL_THREADPOOL_STATUS
- SESSION_CPU_RUNTIME
- SESSION_MEMORY_RUNTIME
- STATEMENT_IOSTAT_COMPLEX_RUNTIME
- LOCAL_ACTIVE_SESSION
- Transaction
- Query
- STATEMENT
- SUMMARY_STATEMENT
- STATEMENT_COUNT
- GLOBAL_STATEMENT_COUNT
- SUMMARY_STATEMENT_COUNT
- GLOBAL_STATEMENT_COMPLEX_HISTORY
- GLOBAL_STATEMENT_COMPLEX_HISTORY_TABLE
- GLOBAL_STATEMENT_COMPLEX_RUNTIME
- STATEMENT_RESPONSETIME_PERCENTILE
- STATEMENT_COMPLEX_RUNTIME
- STATEMENT_COMPLEX_HISTORY_TABLE
- STATEMENT_COMPLEX_HISTORY
- STATEMENT_WLMSTAT_COMPLEX_RUNTIME
- STATEMENT_HISTORY
- Cache/IO
- STATIO_USER_TABLES
- SUMMARY_STATIO_USER_TABLES
- GLOBAL_STATIO_USER_TABLES
- STATIO_USER_INDEXES
- SUMMARY_STATIO_USER_INDEXES
- GLOBAL_STATIO_USER_INDEXES
- STATIO_USER_SEQUENCES
- SUMMARY_STATIO_USER_SEQUENCES
- GLOBAL_STATIO_USER_SEQUENCES
- STATIO_SYS_TABLES
- SUMMARY_STATIO_SYS_TABLES
- GLOBAL_STATIO_SYS_TABLES
- STATIO_SYS_INDEXES
- SUMMARY_STATIO_SYS_INDEXES
- GLOBAL_STATIO_SYS_INDEXES
- STATIO_SYS_SEQUENCES
- SUMMARY_STATIO_SYS_SEQUENCES
- GLOBAL_STATIO_SYS_SEQUENCES
- STATIO_ALL_TABLES
- SUMMARY_STATIO_ALL_TABLES
- GLOBAL_STATIO_ALL_TABLES
- STATIO_ALL_INDEXES
- SUMMARY_STATIO_ALL_INDEXES
- GLOBAL_STATIO_ALL_INDEXES
- STATIO_ALL_SEQUENCES
- SUMMARY_STATIO_ALL_SEQUENCES
- GLOBAL_STATIO_ALL_SEQUENCES
- GLOBAL_STAT_DB_CU
- GLOBAL_STAT_SESSION_CU
- Utility
- REPLICATION_STAT
- GLOBAL_REPLICATION_STAT
- REPLICATION_SLOTS
- GLOBAL_REPLICATION_SLOTS
- BGWRITER_STAT
- GLOBAL_BGWRITER_STAT
- GLOBAL_CKPT_STATUS
- GLOBAL_DOUBLE_WRITE_STATUS
- GLOBAL_PAGEWRITER_STATUS
- GLOBAL_RECORD_RESET_TIME
- GLOBAL_REDO_STATUS
- GLOBAL_RECOVERY_STATUS
- CLASS_VITAL_INFO
- USER_LOGIN
- SUMMARY_USER_LOGIN
- GLOBAL_GET_BGWRITER_STATUS
- GLOBAL_SINGLE_FLUSH_DW_STATUS
- GLOBAL_CANDIDATE_STATUS
- Lock
- Wait Events
- Configuration
- Operator
- Workload Manager
- Global Plancache
- RTO
- DBE_PLDEBUGGER Schema
- DBE_PLDEBUGGER.turn_on
- DBE_PLDEBUGGER.turn_off
- DBE_PLDEBUGGER.local_debug_server_info
- DBE_PLDEBUGGER.attach
- DBE_PLDEBUGGER.info_locals
- DBE_PLDEBUGGER.next
- DBE_PLDEBUGGER.continue
- DBE_PLDEBUGGER.abort
- DBE_PLDEBUGGER.print_var
- DBE_PLDEBUGGER.info_code
- DBE_PLDEBUGGER.step
- DBE_PLDEBUGGER.add_breakpoint
- DBE_PLDEBUGGER.delete_breakpoint
- DBE_PLDEBUGGER.info_breakpoints
- DBE_PLDEBUGGER.backtrace
- DBE_PLDEBUGGER.disable_breakpoint
- DBE_PLDEBUGGER.enable_breakpoint
- DBE_PLDEBUGGER.finish
- DBE_PLDEBUGGER.set_var
- DB4AI Schema
- DBE_PLDEVELOPER
- DBE_SQL_UTIL Schema
- Tool Reference
- Tool Overview
- Client Tool
- Server Tools
- Tools Used in the Internal System
- dsscmd
- dssserver
- mogdb
- gs_backup
- gs_basebackup
- gs_ctl
- gs_initdb
- gs_install
- gs_postuninstall
- gs_preinstall
- gs_sshexkey
- gs_tar
- gs_uninstall
- gs_upgradectl
- gs_expansion
- gs_dropnode
- gs_probackup
- gstrace
- kdb5_util
- kadmin.local
- kinit
- klist
- krb5kdc
- kdestroy
- pg_config
- pg_controldata
- pg_recvlogical
- pg_resetxlog
- pg_archivecleanup
- pssh
- pscp
- transfer.py
- FAQ
- Functions of MogDB Executable Scripts
- System Catalogs and Views Supported by gs_collector
- Error Code Reference
- Description of SQL Error Codes
- Third-Party Library Error Codes
- GAUSS-00001 - GAUSS-00100
- GAUSS-00101 - GAUSS-00200
- GAUSS 00201 - GAUSS 00300
- GAUSS 00301 - GAUSS 00400
- GAUSS 00401 - GAUSS 00500
- GAUSS 00501 - GAUSS 00600
- GAUSS 00601 - GAUSS 00700
- GAUSS 00701 - GAUSS 00800
- GAUSS 00801 - GAUSS 00900
- GAUSS 00901 - GAUSS 01000
- GAUSS 01001 - GAUSS 01100
- GAUSS 01101 - GAUSS 01200
- GAUSS 01201 - GAUSS 01300
- GAUSS 01301 - GAUSS 01400
- GAUSS 01401 - GAUSS 01500
- GAUSS 01501 - GAUSS 01600
- GAUSS 01601 - GAUSS 01700
- GAUSS 01701 - GAUSS 01800
- GAUSS 01801 - GAUSS 01900
- GAUSS 01901 - GAUSS 02000
- GAUSS 02001 - GAUSS 02100
- GAUSS 02101 - GAUSS 02200
- GAUSS 02201 - GAUSS 02300
- GAUSS 02301 - GAUSS 02400
- GAUSS 02401 - GAUSS 02500
- GAUSS 02501 - GAUSS 02600
- GAUSS 02601 - GAUSS 02700
- GAUSS 02701 - GAUSS 02800
- GAUSS 02801 - GAUSS 02900
- GAUSS 02901 - GAUSS 03000
- GAUSS 03001 - GAUSS 03100
- GAUSS 03101 - GAUSS 03200
- GAUSS 03201 - GAUSS 03300
- GAUSS 03301 - GAUSS 03400
- GAUSS 03401 - GAUSS 03500
- GAUSS 03501 - GAUSS 03600
- GAUSS 03601 - GAUSS 03700
- GAUSS 03701 - GAUSS 03800
- GAUSS 03801 - GAUSS 03900
- GAUSS 03901 - GAUSS 04000
- GAUSS 04001 - GAUSS 04100
- GAUSS 04101 - GAUSS 04200
- GAUSS 04201 - GAUSS 04300
- GAUSS 04301 - GAUSS 04400
- GAUSS 04401 - GAUSS 04500
- GAUSS 04501 - GAUSS 04600
- GAUSS 04601 - GAUSS 04700
- GAUSS 04701 - GAUSS 04800
- GAUSS 04801 - GAUSS 04900
- GAUSS 04901 - GAUSS 05000
- GAUSS 05001 - GAUSS 05100
- GAUSS 05101 - GAUSS 05200
- GAUSS 05201 - GAUSS 05300
- GAUSS 05301 - GAUSS 05400
- GAUSS 05401 - GAUSS 05500
- GAUSS 05501 - GAUSS 05600
- GAUSS 05601 - GAUSS 05700
- GAUSS 05701 - GAUSS 05800
- GAUSS 05801 - GAUSS 05900
- GAUSS 05901 - GAUSS 06000
- GAUSS 06001 - GAUSS 06100
- GAUSS 06101 - GAUSS 06200
- GAUSS 06201 - GAUSS 06300
- GAUSS 06301 - GAUSS 06400
- GAUSS 06401 - GAUSS 06500
- GAUSS 06501 - GAUSS 06600
- GAUSS 06601 - GAUSS 06700
- GAUSS 06701 - GAUSS 06800
- GAUSS 06801 - GAUSS 06900
- GAUSS 06901 - GAUSS 07000
- GAUSS 07001 - GAUSS 07100
- GAUSS 07101 - GAUSS 07200
- GAUSS 07201 - GAUSS 07300
- GAUSS 07301 - GAUSS 07400
- GAUSS 07401 - GAUSS 07500
- GAUSS 50000 - GAUSS 50999
- GAUSS 51000 - GAUSS 51999
- GAUSS 52000 - GAUSS 52999
- GAUSS 53000 - GAUSS 53699
- Error Log Reference
- System Catalogs and System Views
- Common Faults and Identification
- Common Fault Locating Methods
- Common Fault Locating Cases
- Core Fault Locating
- Permission/Session/Data Type Fault Location
- Service/High Availability/Concurrency Fault Location
- Standby Node in the Need Repair (WAL) State
- Service Startup Failure
- Primary Node Is Hung in Demoting During a Switchover
- "too many clients already" Is Reported or Threads Failed To Be Created in High Concurrency Scenarios
- Performance Deterioration Caused by Dirty Page Flushing Efficiency During TPCC High Concurrentcy Long Term Stable Running
- A Query Error Is Reported Due to Predicate Pushdown
- Table/Partition Table Fault Location
- File System/Disk/Memory Fault Location
- After You Run the du Command to Query Data File Size In the XFS File System, the Query Result Is Greater than the Actual File Size
- File Is Damaged in the XFS File System
- Insufficient Memory
- "Error:No space left on device" Is Displayed
- When the TPC-C is running and a disk to be injected is full, the TPC-C stops responding
- Disk Space Usage Reaches the Threshold and the Database Becomes Read-only
- Shared Memory Leakage
- SQL Fault Location
- Index Fault Location
- CM Two-Node Fault Location
- Source Code Parsing
- FAQs
- Glossary
- Communication Matrix
- Mogeaver
Manual Configuration of VIP
Objectives
This section introduces how to manually configure or enable VIP function in a database cluster where CM cluster management software has been deployed.
Note:
MogDB 5.0.4 and later versions support automatic VIP mounting via PTK (v1.2.0+), see PTK documentation for details.
Additionally, this section uses a cluster with one primary node and two standby nodes as an example.
VIP Configuration Procedure
1. Installing ifconfig
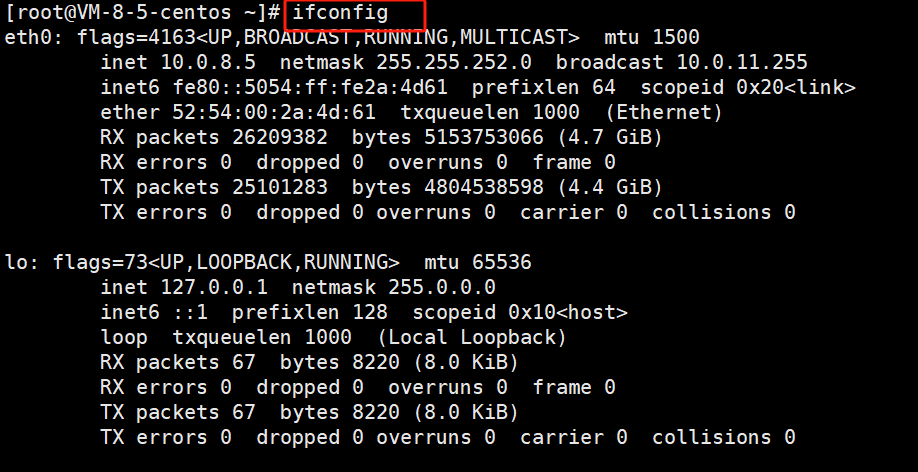
The CM cluster management software relies on the ifconfig command, so each server node in the database cluster needs to have ifconfig properly installed.
You can refer to the following command to install ifconfig.
# CentOS/RHEL
sudo yum install net-tools

# Debian/Ubuntu
sudo apt-get update
sudo apt-get install net-tools
After the installation is complete, typing the ifconfig command in the server shell will output network information for the local machine.
2. Adding ifconfig Permission
On each node of the cluster, modify the sudoers configuration file in the /etc directory by adding the following content to grant the cluster user the ifconfig permission.
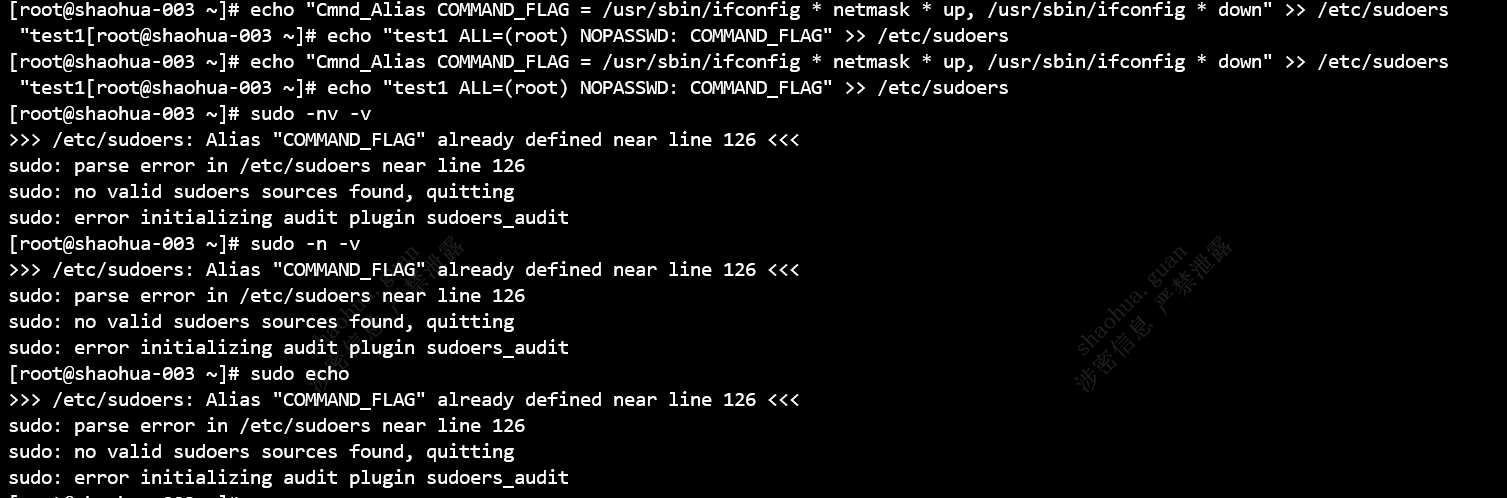
echo "Cmnd_Alias COMMAND_FLAG = /usr/sbin/ifconfig * netmask * up, /usr/sbin/ifconfig * down" >> /etc/sudoers
echo "Cluster username ALL=(root) NOPASSWD: COMMAND_FLAG" >> /etc/sudoers
Dynamic binding and unbinding of VIP is to operate with a NIC, therefore ifconfig permission is required to allow the cluster user to binding or unbinding an VIP by using sudo ifconfig. This operation may give rise to risks, such as wiretapping, tampering, counterfeiting, and denial of service. Please execute with caution.
![]() Warning:
Warning:
Both of the above commands can only be executed once on each node and cannot be configured twice, or else the sudo ifconfig command may report an error. An example of an error is shown below:
3. Setting the VIP Resource File
Run the cm_ctl res command on any node in the cluster to add floatIp resources (VIP resources) and distribute the VIP resources to other nodes in the cluster. For details, refer to the following two steps:
(1) Add VIP resources.
res_name indicates the name of the VIP resource. resources_type must be specified as VIP. float_ip indicates the virtual IP address of the VIP resource. The command is as follows:
cm_ctl res --add --res_name="VIP_az" --res_attr="resources_type=VIP, float_ip=<VIP>"(2) Add mappings between VIP resources and nodes.
node_id specifies the node ID. res_instance_id indicates the ID of the DN instance bound to the CM. The value must be consistent with the ID of the corresponding DN instance. The command is as follows:
cm_ctl res --edit --res_name="VIP_az" --add_inst="node_id=1, res_instance_id=6001" --inst_attr="base_ip=<IP of node1>"
cm_ctl res --edit --res_name="VIP_az" --add_inst="node_id=2, res_instance_id=6002" --inst_attr="base_ip=<IP of node2>"
cm_ctl res --edit --res_name="VIP_az" --add_inst="node_id=3, res_instance_id=6003" --inst_attr="base_ip=<IP of node3>"
After the preceding commands are executed successfully, the cm_resource.json file is generated in the cm_agent directo directory. For details, see Appendix.
You are advised to run the cm_ctl res --check command. The customized resource file must be consistent on each node. If no error is found, manually distribute the file to other nodes. After the distribution is complete, restart the cluster to make the file take effect.
4. Configure the pg_hba.conf File
Run the following command on any node to add VIP resources in sha256 mode in the pg_hba.conf file:
gs_guc set -N all -h "host all all <VIP>/32 sha256"5. Manually Attach a VIP to the Primary Instance of a Database Cluster
(1) Log in to the primary instance of a database cluster, create a user for accessing the database cluster using VIP.
create user <VIP user> with password '<Password>';(2) Grant the user permission.
GRANT ALL PRIVILEGES TO <VIP user>;(3) Create a virtual NIC and binding the VIP.
ifconfig <NIC in the same network segment as the VIP>:<Database service port> <VIP> netmask <netmask> up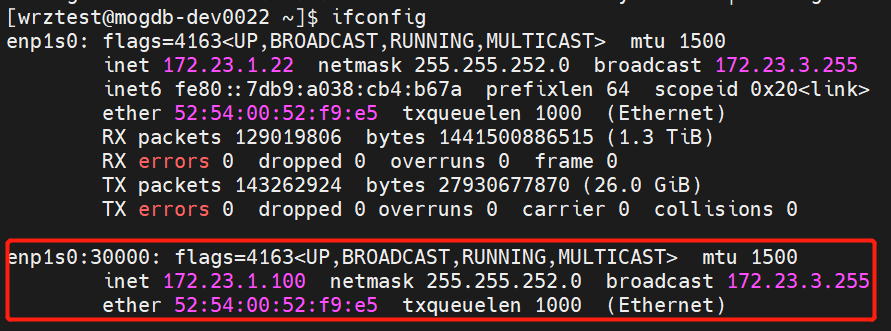
6. Restart the Cluster
After VIP resources are configured, restart the cluster for the configuration to take effect.
cm_ctl stop && cm_ctl startQuerying the VIP
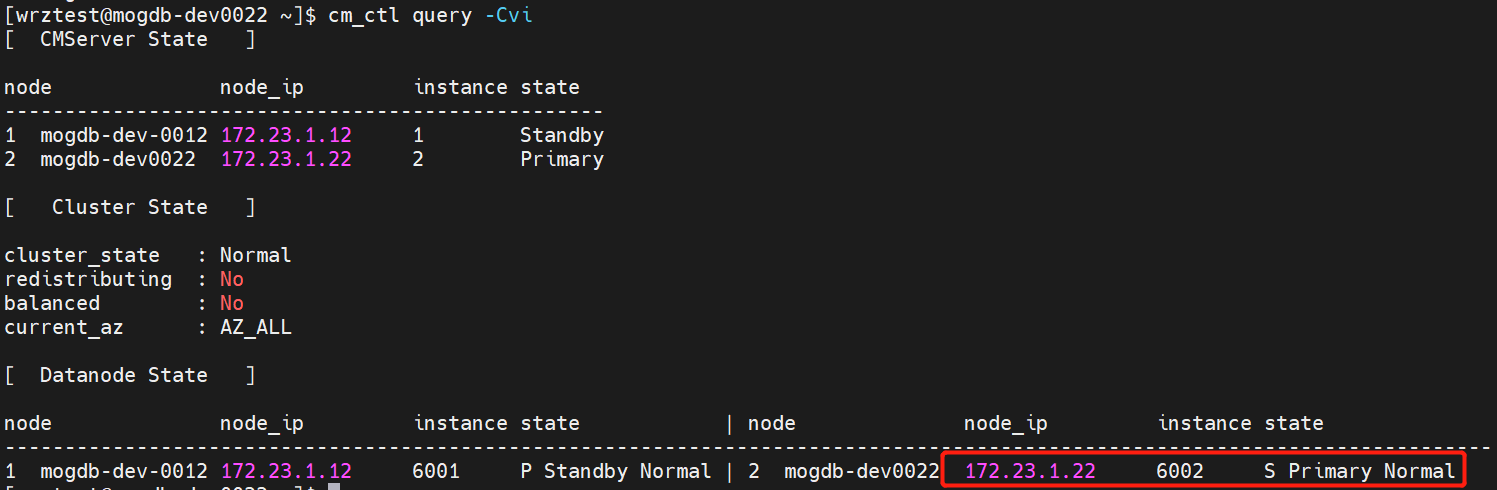
After the VIP resource takes effects, run the following command to query its status:
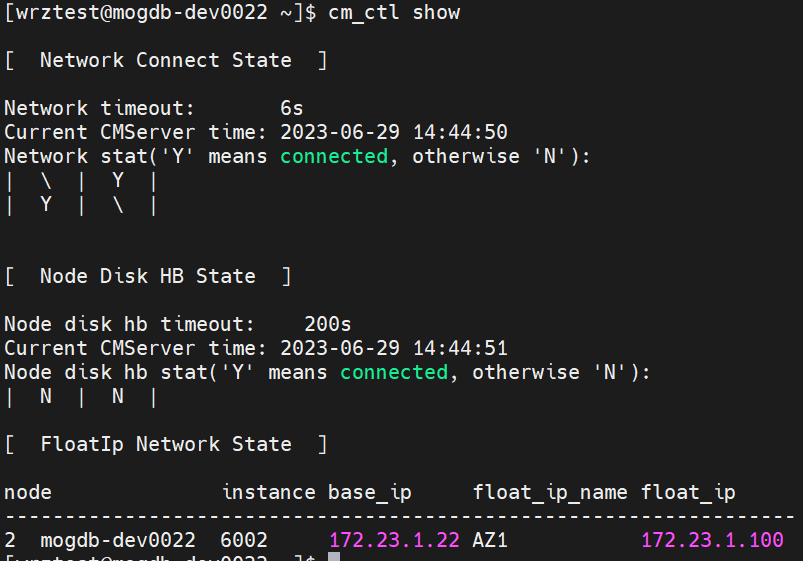
Verify VIP Availability
After the VIP is configured, run the following command to verify it:
gsql -U <VIP user> -W <Password of the VIP user> -d postgres -r -p <Port of a database instance> -h <VIP>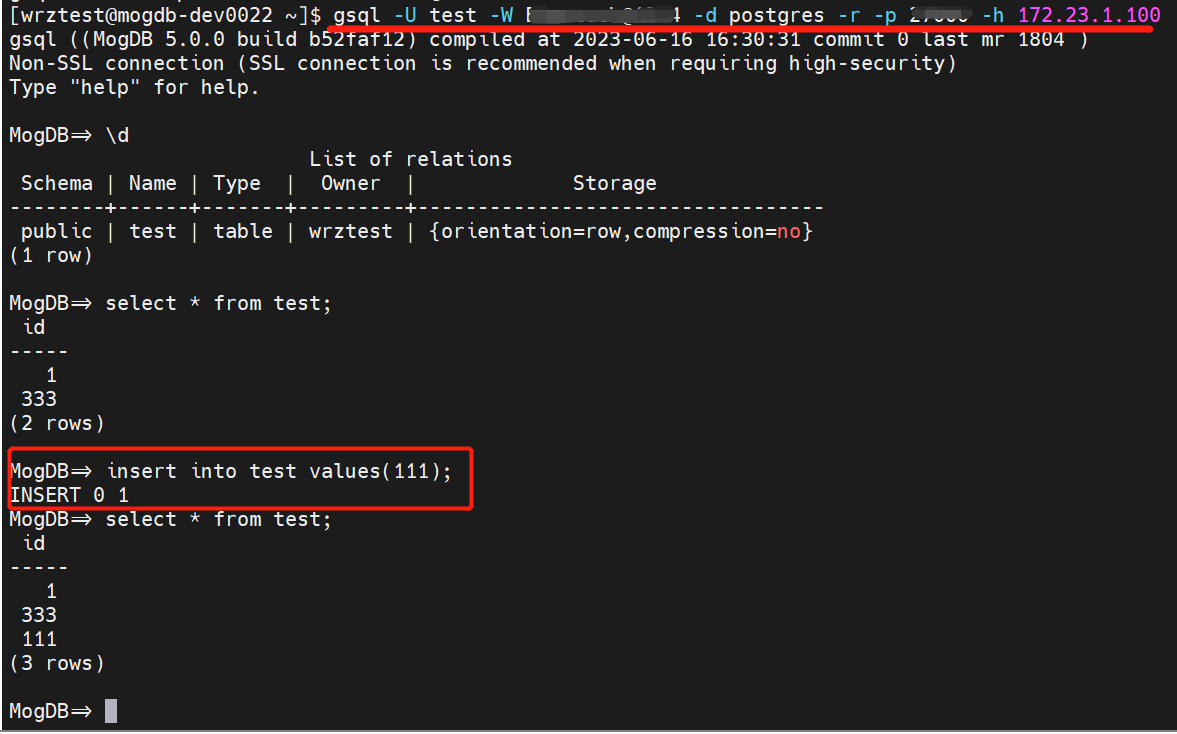
(Optional) Other Process
If the CM cluster includes two nodes. To reduce the possibility of incorrect database cluster fault switchover, run the following command to set the db_service_vip parameter in the cm_agent.conf configuration file.
cm_ctl set --param --agent -k db_service_vip=<VIP>
cm_ctl reload --param --agent
Appendix
VIP resource file cm_resource.json example:
{
    "resources":
        [{"name": "VIP_az1",
          "resources_type": "VIP",
          "instances":
              [{"node_id":      1,
                "res_instance_id":      6001,
                "inst_attr":    "base_ip=<IP of node1>"
              },
              {"node_id":      2,
                "res_instance_id":      6002,
                "inst_attr":    "base_ip=<IP of node2>"
              },
              {"node_id":      3,
                "res_instance_id":      6003,
                "inst_attr":    "base_ip=<IP of node3>"
              }],
          "float_ip":     "<VIP>"
        }
}