- About PTK
- Quick Start
- Guidance
- Preparing Configuration File
- Checking the System
- Deploy Database Cluster
- Manage Clusters
- Show Cluster List
- Show Cluster Status
- Start Database
- Stop Database
- Restart Database
- Rebuild Database
- Switchover
- Failover
- Show Plugin Information
- Install Plugins
- Upgrade Database
- Scale-out Cluster
- Scale-in Cluster
- Show Database HBA
- Set Database HBA
- Show Database Parameters
- Set Database Parameters
- Show Cluster Topology Configuration
- Show Cluster Meta Information
- Update Cluster Comment
- Update Database IP
- Role Management
- Install CM
- Uninstall CM
- Manage Cluster VIP
- Install MogHA Service
- Uninstall MogHA Service
- Rename Cluster
- Create Empty Cluster
- Throw Out A Node
- Takeover A Node
- Manage Cluster
- Uninstall Database Cluster
- Collect OS Information
- Download MogDB Installer
- Encrypt Sensitive Information
- Upgrade PTK
- PTKC
- Compatible With Higher Versions of MogDB
- Reference
- Samples of Configuration Files
- Commands
- ptk
- ptk completion
- ptk view-static-config
- ptk init-cluster
- ptk collect
- ptk rec-guc
- ptk cache
- ptk gen-ptkc
- ptk manage
- ptk demo
- ptk meta
- ptk version
- ptk self
- ptk gen-om-xml
- ptk env
- ptk gen-static-config
- ptk cluster
- ptk cluster createdb
- ptk cluster uninstall-compat-tools
- ptk cluster install-compat-tools
- ptk cluster install-mogila
- ptk cluster rename
- ptk cluster throwout
- ptk cluster takeover
- ptk cluster uninstall-cm
- ptk cluster install-cm
- ptk cluster gen-cert-files
- ptk cluster load-cm-vip
- ptk cluster del-kerberos-auth
- ptk cluster add-kerberos-auth
- ptk cluster uninstall-kerberos-server
- ptk cluster install-kerberos-server
- ptk cluster is-in-upgrade
- ptk cluster upgrade-rollback
- ptk cluster upgrade-commit
- ptk cluster upgrade
- ptk cluster demote
- ptk cluster promote
- ptk cluster refresh
- ptk cluster shell
- ptk cluster modify-comment
- ptk cluster show-config
- ptk cluster set-guc
- ptk cluster show-guc
- ptk cluster set-hba
- ptk cluster show-hba
- ptk cluster scale-out
- ptk cluster scale-in
- ptk cluster uninstall-mogha
- ptk cluster install-mogha
- ptk cluster list-plugins
- ptk cluster install-plugin
- ptk cluster inspect
- ptk cluster failover
- ptk cluster switchover
- ptk cluster build
- ptk cluster status
- ptk cluster restart
- ptk cluster stop
- ptk cluster start
- ptk uninstall
- ptk ls
- ptk install
- ptk exec
- ptk template
- ptk encrypt
- ptk checkos
- ptk download
- ptk candidate
- Troubleshooting
- FAQ
- Release Notes
- Community
- Appendix: YAML Syntax
Deploy Database Cluster
Recommended Process
When deploying a database cluster, it is recommended that you follow the process below:
- Prepare the configuration file that describes the cluster.
- Perform operation system check to ensure that the operating system does not have unusual check items before installation.
- Download the required database installation package from the official website.
- Deploy the database cluster.
Database Cluster Installation
Instruction
Since all PTK behaviors are based on SSH connections for issuing commands, we need to configure the ssh_option field for each database server in the configuration file. Of course, if all servers have the same connection user, port, and password, you only need to configure ssh_option once in the global section.
For the login user in ssh_option, we recommend that you configure the root user or a user with sudo privileges. Since the database as a basic software may have more stringent requirements than other applications, you need to use the superuser privilege to set a more permissive ulimit configuration for the system user running the database. At the same time, if you provide super user, you don't need to create the operating system user to run the database in advance, you only need to define the user name in the configuration file, and PTK will automatically create the corresponding user for you and set up the ulimit configuration.
Of course, if you are under the mandatory requirements of enterprise security, you may not be able to meet the conditions of direct login of root user, but you can also use PTK for deployment. In this case, you need to do the following 3 steps in advance:
-
Create the operating system user on the server that will be used to run the database (assuming the user name is
omm). -
Add the following configuration entry for this user at the end of the
/etc/security/limits.conffile (replaceommwith the username you created):omm soft as unlimited omm hard as unlimited omm soft nproc unlimited omm hard nproc unlimited omm soft nofile 1000000 omm hard nofile 1000000 omm soft stack unlimited omm hard stack unlimited -
Change the SSH login user to
ommin thessh_optionsection of the configuration file.ssh_option: user: omm ...
Note: If you use a non-superuser for cluster management, some commands that rely on superprivileges will not be available later, such as
install-mogha.
Online Installation
Installation is accomplished with a single line of command:
ptk install -f config.yamlThis command automatically downloads the latest LTS version of MogDB from the network and installs it. If you wish to specify the version of MogDB yourself, you can do so with the --db-version option, for example:
ptk install -f config.yaml --db-version 5.0.7You can use ptk candidate db to see the list of MogDB versions that PTK supports to download automatically.
PTK will launch the database cluster by default after installing the database cluster. If you do not want the cluster to be launched automatically after installation, you can specify the -skip-launch-db option in the command line.
Offline Installation
If you have downloaded the installer in advance, you can specify a local installer for offline installation with the -p option:
ptk install -f config.yaml -p <package>Deploy CM Cluster Together
PTK supports deploying the CM cluster at the same time as the database cluster, you just need to add an --install-cm option to the install command:
Minimum of 2 nodes for the cluster to take effect.
ptk install -f config.yaml --install-cmBy default, PTK deploys the CM server and database instances together to match the number of databases. If the number of clusters is greater than 3, we recommend deploying an odd number of CM server nodes by default due to the majority election algorithm for CM High Availability, so when deploying an even number of database instances, PTK will interactively allow you to select a node to not deploy CM server. You can remove this restriction by adding the --not-limit-cm-nodes option to the install command if you still want the number of CM server and database instances to be consistent.
Deploy In Resource Pooling Mode(beta)
Although the kernel resource pooling feature is still under deep development, PTK has gradually supported resource pooling deployment since version 1.2.0. Resource pooling deployment provides the ability for primary and standby nodes to share storage, realizes resource pooling HA deployment form based on magnetic array devices, solves the problem of doubling the storage capacity of a single machine under traditional HA deployment, and at the same time, the standby nodes support real-time consistency of reads.
The resource pooling architecture diagram is shown below.
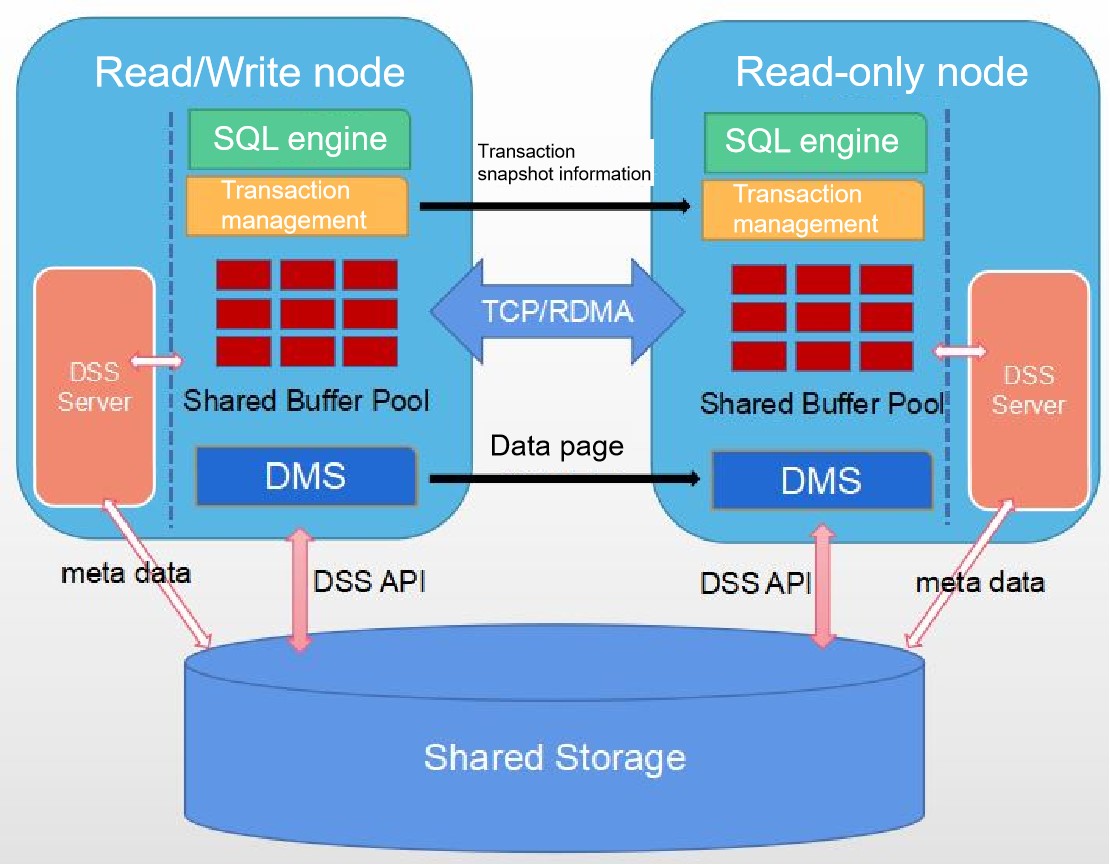
PTK supports deployment in resource pooling scenarios. Since the DSS module has been added to the resource pooling architecture and relies on CM for high availability management of clusters, we need to add the dss_option and cm_option sections to the configuration file, as shown in the following example configuration.
global:
    cluster_name: c1
    user: omm
    db_password: pTk6Y2I1OWFiZjI8RT1FPUE9RFZfVTUzTy0zUlR5TDZUTmh1STE4VkQ0T2RDYXBNMThoSlNhZDY3UHB4WVE=
    db_port: 26000
    base_dir: /data/mogdb
    ssh_option:
        port: 22
        user: root
        password: pTk6ZDJmZjZlZjI8RT1FPUE9RUs4WEh1OUJRQURfM29GUjZyb3gzZGU3LVRmLTM3Mm5ySmZ5anJXVkNOTUE=
    cm_option:
        dir: /data/mogdb/cm
        cm_server_port: 15300
    dss_option:
        dir: /data/mogdb/dss
        dss_port: 26010
        dms_port: 26020
        data_vg_name: data
        data_vg_path: /dev/data_shared
        inst_vg_map:
          172.23.1.28: /dev/data_private_28
          172.23.1.45: /dev/data_private_45
        cm_share_vg_path: /dev/cm_shared
        cm_voting_vg_path: /dev/cm_vote
        enable_ssl: on
db_servers:
    - host: 172.23.1.28
      role: primary
    - host: 172.23.1.45
      role: standby
The rest of the configuration is the same as a normal installation, we focus on the dss_option section.
In the dss_option section, there are the following fields:
| field | description |
|---|---|
| dir | Installation directory for the dss module. |
| dss_port | The port on which the dssserver process listens when running, default 26010. |
| dms_port | The port for communication between database kernels in resource pooling mode, default 26020. |
| data_vg_name | Customized shared data volume name, default data. |
| data_vg_path | Shared data volume disk device path. |
| inst_vg_map | Private disk junction mapping for each database instance, where the key is the database instance IP and the value is the private data disk path for the corresponding instance. |
| cm_share_vg_path | CM shared disk device path. |
| cm_voting_vg_path | CM voting disk device path. |
| enable_ssl | Whether to use SSL to encrypt communications. |
Once you have prepared the configuration file, simply add the --enable-dss option to the install command:
ptk install -f config.yaml --enable-dssMore Parameters
The above documentation gives some examples of parameter combinations for different usage scenarios, PTK's install command supports many more parameters, you can check Commands for more information.
Installation Result Status
| Status | Description |
|---|---|
| precheck_success | Pre-check succeeded |
| precheck_failed | Pre-check failed |
| setup_db_success | Database instance installed successfully |
| setup_db_failed | Database instance installation failed |
| setup_cm_success | CM component instance was installed successfully |
| setup_cm_failed | CM component instance installation failed |
| init_dss_failed | Failed to initialize DSS component |
| init_dss_success | Initializing DSS Components Succeeded |
| initdb_failed | Failed to initialize database |
| initdb_success | Initialization of the database succeeded |
| rollback_success | Installation steps rolled back successfully |
| need_rollback_manually | Manual rollback required |
| start_success | Database startup successful |
| start_failed | Database startup failed |
| need_start_manually | Manual startup required |