- About MogDB
- Quick Start
- MogDB Playground
- Container-based MogDB Installation
- Installation on a Single Node
- MogDB Access
- Use CLI to Access MogDB
- Use GUI to Access MogDB
- Use Middleware to Access MogDB
- Use Programming Language to Access MogDB
- Using Sample Dataset Mogila
- Characteristic Description
- High Performance
- High Availability (HA)
- Maintainability
- Database Security
- Access Control Model
- Separation of Control and Access Permissions
- Database Encryption Authentication
- Data Encryption and Storage
- Database Audit
- Network Communication Security
- Resource Label
- Unified Audit
- Dynamic Data Anonymization
- Row-Level Access Control
- Password Strength Verification
- Equality Query in a Fully-encrypted Database
- Ledger Database Mechanism
- Enterprise-Level Features
- Support for Functions and Stored Procedures
- SQL Hints
- Full-Text Indexing
- Copy Interface for Error Tolerance
- Partitioning
- Support for Advanced Analysis Functions
- Materialized View
- HyperLogLog
- Creating an Index Online
- Autonomous Transaction
- Global Temporary Table
- Pseudocolumn ROWNUM
- Stored Procedure Debugging
- JDBC Client Load Balancing and Read/Write Isolation
- In-place Update Storage Engine
- Application Development Interfaces
- AI Capabilities
- Installation Guide
- Container Installation
- Simplified Installation Process
- Standard Installation
- Manual Installation
- Administrator Guide
- Routine Maintenance
- Starting and Stopping MogDB
- Using the gsql Client for Connection
- Routine Maintenance
- Checking OS Parameters
- Checking MogDB Health Status
- Checking Database Performance
- Checking and Deleting Logs
- Checking Time Consistency
- Checking The Number of Application Connections
- Routinely Maintaining Tables
- Routinely Recreating an Index
- Data Security Maintenance Suggestions
- Log Reference
- Primary and Standby Management
- MOT Engine
- Introducing MOT
- Using MOT
- Concepts of MOT
- Appendix
- Column-store Tables Management
- Backup and Restoration
- Importing and Exporting Data
- Importing Data
- Exporting Data
- Upgrade Guide
- Routine Maintenance
- AI Features Guide
- Overview
- Predictor: AI Query Time Forecasting
- X-Tuner: Parameter Optimization and Diagnosis
- SQLdiag: Slow SQL Discovery
- A-Detection: Status Monitoring
- Index-advisor: Index Recommendation
- DeepSQL
- AI-Native Database (DB4AI)
- Security Guide
- Developer Guide
- Application Development Guide
- Development Specifications
- Development Based on JDBC
- Overview
- JDBC Package, Driver Class, and Environment Class
- Development Process
- Loading the Driver
- Connecting to a Database
- Connecting to the Database (Using SSL)
- Running SQL Statements
- Processing Data in a Result Set
- Closing a Connection
- Managing Logs
- Example: Common Operations
- Example: Retrying SQL Queries for Applications
- Example: Importing and Exporting Data Through Local Files
- Example 2: Migrating Data from a MY Database to MogDB
- Example: Logic Replication Code
- Example: Parameters for Connecting to the Database in Different Scenarios
- JDBC API Reference
- java.sql.Connection
- java.sql.CallableStatement
- java.sql.DatabaseMetaData
- java.sql.Driver
- java.sql.PreparedStatement
- java.sql.ResultSet
- java.sql.ResultSetMetaData
- java.sql.Statement
- javax.sql.ConnectionPoolDataSource
- javax.sql.DataSource
- javax.sql.PooledConnection
- javax.naming.Context
- javax.naming.spi.InitialContextFactory
- CopyManager
- Development Based on ODBC
- Development Based on libpq
- Development Based on libpq
- libpq API Reference
- Database Connection Control Functions
- Database Statement Execution Functions
- Functions for Asynchronous Command Processing
- Functions for Canceling Queries in Progress
- Example
- Connection Characters
- Psycopg-Based Development
- Commissioning
- Appendices
- Stored Procedure
- User Defined Functions
- PL/pgSQL-SQL Procedural Language
- Scheduled Jobs
- Autonomous Transaction
- Logical Replication
- Logical Decoding
- Foreign Data Wrapper
- Materialized View
- Materialized View Overview
- Full Materialized View
- Incremental Materialized View
- Resource Load Management
- Overview
- Resource Management Preparation
- Application Development Guide
- Performance Tuning Guide
- System Optimization
- SQL Optimization
- WDR Snapshot Schema
- TPCC Performance Tuning Guide
- Reference Guide
- System Catalogs and System Views
- Overview of System Catalogs and System Views
- System Catalogs
- GS_AUDITING_POLICY
- GS_AUDITING_POLICY_ACCESS
- GS_AUDITING_POLICY_FILTERS
- GS_AUDITING_POLICY_PRIVILEGES
- GS_CLIENT_GLOBAL_KEYS
- GS_CLIENT_GLOBAL_KEYS_ARGS
- GS_COLUMN_KEYS
- GS_COLUMN_KEYS_ARGS
- GS_ENCRYPTED_COLUMNS
- GS_ENCRYPTED_PROC
- GS_GLOBAL_CHAIN
- GS_MASKING_POLICY
- GS_MASKING_POLICY_ACTIONS
- GS_MASKING_POLICY_FILTERS
- GS_MATVIEW
- GS_MATVIEW_DEPENDENCY
- GS_OPT_MODEL
- GS_POLICY_LABEL
- GS_RECYCLEBIN
- GS_TXN_SNAPSHOT
- GS_WLM_INSTANCE_HISTORY
- GS_WLM_OPERATOR_INFO
- GS_WLM_PLAN_ENCODING_TABLE
- GS_WLM_PLAN_OPERATOR_INFO
- GS_WLM_EC_OPERATOR_INFO
- PG_AGGREGATE
- PG_AM
- PG_AMOP
- PG_AMPROC
- PG_APP_WORKLOADGROUP_MAPPING
- PG_ATTRDEF
- PG_ATTRIBUTE
- PG_AUTHID
- PG_AUTH_HISTORY
- PG_AUTH_MEMBERS
- PG_CAST
- PG_CLASS
- PG_COLLATION
- PG_CONSTRAINT
- PG_CONVERSION
- PG_DATABASE
- PG_DB_ROLE_SETTING
- PG_DEFAULT_ACL
- PG_DEPEND
- PG_DESCRIPTION
- PG_DIRECTORY
- PG_ENUM
- PG_EXTENSION
- PG_EXTENSION_DATA_SOURCE
- PG_FOREIGN_DATA_WRAPPER
- PG_FOREIGN_SERVER
- PG_FOREIGN_TABLE
- PG_INDEX
- PG_INHERITS
- PG_JOB
- PG_JOB_PROC
- PG_LANGUAGE
- PG_LARGEOBJECT
- PG_LARGEOBJECT_METADATA
- PG_NAMESPACE
- PG_OBJECT
- PG_OPCLASS
- PG_OPERATOR
- PG_OPFAMILY
- PG_PARTITION
- PG_PLTEMPLATE
- PG_PROC
- PG_RANGE
- PG_RESOURCE_POOL
- PG_REWRITE
- PG_RLSPOLICY
- PG_SECLABEL
- PG_SHDEPEND
- PG_SHDESCRIPTION
- PG_SHSECLABEL
- PG_STATISTIC
- PG_STATISTIC_EXT
- PG_SYNONYM
- PG_TABLESPACE
- PG_TRIGGER
- PG_TS_CONFIG
- PG_TS_CONFIG_MAP
- PG_TS_DICT
- PG_TS_PARSER
- PG_TS_TEMPLATE
- PG_TYPE
- PG_USER_MAPPING
- PG_USER_STATUS
- PG_WORKLOAD_GROUP
- PLAN_TABLE_DATA
- STATEMENT_HISTORY
- System Views
- GET_GLOBAL_PREPARED_XACTS
- GS_AUDITING
- GS_AUDITING_ACCESS
- GS_AUDITING_PRIVILEGE
- GS_CLUSTER_RESOURCE_INFO
- GS_INSTANCE_TIME
- GS_LABELS
- GS_MASKING
- GS_MATVIEWS
- GS_SESSION_MEMORY
- GS_SESSION_CPU_STATISTICS
- GS_SESSION_MEMORY_CONTEXT
- GS_SESSION_MEMORY_DETAIL
- GS_SESSION_MEMORY_STATISTICS
- GS_SQL_COUNT
- GS_WLM_CGROUP_INFO
- GS_WLM_PLAN_OPERATOR_HISTORY
- GS_WLM_REBUILD_USER_RESOURCE_POOL
- GS_WLM_RESOURCE_POOL
- GS_WLM_USER_INFO
- GS_STAT_SESSION_CU
- GS_TOTAL_MEMORY_DETAIL
- MPP_TABLES
- PG_AVAILABLE_EXTENSION_VERSIONS
- PG_AVAILABLE_EXTENSIONS
- PG_COMM_DELAY
- PG_COMM_RECV_STREAM
- PG_COMM_SEND_STREAM
- PG_COMM_STATUS
- PG_CONTROL_GROUP_CONFIG
- PG_CURSORS
- PG_EXT_STATS
- PG_GET_INVALID_BACKENDS
- PG_GET_SENDERS_CATCHUP_TIME
- PG_GROUP
- PG_GTT_RELSTATS
- PG_GTT_STATS
- PG_GTT_ATTACHED_PIDS
- PG_INDEXES
- PG_LOCKS
- PG_NODE_ENV
- PG_OS_THREADS
- PG_PREPARED_STATEMENTS
- PG_PREPARED_XACTS
- PG_REPLICATION_SLOTS
- PG_RLSPOLICIES
- PG_ROLES
- PG_RULES
- PG_SECLABELS
- PG_SETTINGS
- PG_SHADOW
- PG_STATS
- PG_STAT_ACTIVITY
- PG_STAT_ALL_INDEXES
- PG_STAT_ALL_TABLES
- PG_STAT_BAD_BLOCK
- PG_STAT_BGWRITER
- PG_STAT_DATABASE
- PG_STAT_DATABASE_CONFLICTS
- PG_STAT_USER_FUNCTIONS
- PG_STAT_USER_INDEXES
- PG_STAT_USER_TABLES
- PG_STAT_REPLICATION
- PG_STAT_SYS_INDEXES
- PG_STAT_SYS_TABLES
- PG_STAT_XACT_ALL_TABLES
- PG_STAT_XACT_SYS_TABLES
- PG_STAT_XACT_USER_FUNCTIONS
- PG_STAT_XACT_USER_TABLES
- PG_STATIO_ALL_INDEXES
- PG_STATIO_ALL_SEQUENCES
- PG_STATIO_ALL_TABLES
- PG_STATIO_SYS_INDEXES
- PG_STATIO_SYS_SEQUENCES
- PG_STATIO_SYS_TABLES
- PG_STATIO_USER_INDEXES
- PG_STATIO_USER_SEQUENCES
- PG_STATIO_USER_TABLES
- PG_TABLES
- PG_TDE_INFO
- PG_THREAD_WAIT_STATUS
- PG_TIMEZONE_ABBREVS
- PG_TIMEZONE_NAMES
- PG_TOTAL_MEMORY_DETAIL
- PG_TOTAL_USER_RESOURCE_INFO
- PG_TOTAL_USER_RESOURCE_INFO_OID
- PG_USER
- PG_USER_MAPPINGS
- PG_VARIABLE_INFO
- PG_VIEWS
- PLAN_TABLE
- GS_FILE_STAT
- GS_OS_RUN_INFO
- GS_REDO_STAT
- GS_SESSION_STAT
- GS_SESSION_TIME
- GS_THREAD_MEMORY_CONTEXT
- Functions and Operators
- Logical Operators
- Comparison Operators
- Character Processing Functions and Operators
- Binary String Functions and Operators
- Bit String Functions and Operators
- Mode Matching Operators
- Mathematical Functions and Operators
- Date and Time Processing Functions and Operators
- Type Conversion Functions
- Geometric Functions and Operators
- Network Address Functions and Operators
- Text Search Functions and Operators
- JSON/JSONB Functions and Operators
- HLL Functions and Operators
- SEQUENCE Functions
- Array Functions and Operators
- Range Functions and Operators
- Aggregate Functions
- Window Functions
- Security Functions
- Ledger Database Functions
- Encrypted Equality Functions
- Set Returning Functions
- Conditional Expression Functions
- System Information Functions
- System Administration Functions
- Configuration Settings Functions
- Universal File Access Functions
- Server Signal Functions
- Backup and Restoration Control Functions
- Snapshot Synchronization Functions
- Database Object Functions
- Advisory Lock Functions
- Logical Replication Functions
- Segment-Page Storage Functions
- Other Functions
- Undo System Functions
- Statistics Information Functions
- Trigger Functions
- Hash Function
- Prompt Message Function
- Global Temporary Table Functions
- Fault Injection System Function
- AI Feature Functions
- Dynamic Data Masking Functions
- Other System Functions
- Internal Functions
- Obsolete Functions
- Supported Data Types
- Numeric Types
- Monetary Types
- Boolean Types
- Enumerated Types
- Character Types
- Binary Types
- Date/Time Types
- Geometric
- Network Address Types
- Bit String Types
- Text Search Types
- UUID
- JSON/JSONB Types
- HLL
- Array Types
- Range
- OID Types
- Pseudo-Types
- Data Types Supported by Column-store Tables
- XML Types
- Data Type Used by the Ledger Database
- SQL Syntax
- ABORT
- ALTER AGGREGATE
- ALTER AUDIT POLICY
- ALTER DATABASE
- ALTER DATA SOURCE
- ALTER DEFAULT PRIVILEGES
- ALTER DIRECTORY
- ALTER EXTENSION
- ALTER FOREIGN TABLE
- ALTER FUNCTION
- ALTER GROUP
- ALTER INDEX
- ALTER LANGUAGE
- ALTER LARGE OBJECT
- ALTER MASKING POLICY
- ALTER MATERIALIZED VIEW
- ALTER OPERATOR
- ALTER RESOURCE LABEL
- ALTER RESOURCE POOL
- ALTER ROLE
- ALTER ROW LEVEL SECURITY POLICY
- ALTER RULE
- ALTER SCHEMA
- ALTER SEQUENCE
- ALTER SERVER
- ALTER SESSION
- ALTER SYNONYM
- ALTER SYSTEM KILL SESSION
- ALTER SYSTEM SET
- ALTER TABLE
- ALTER TABLE PARTITION
- ALTER TABLE SUBPARTITION
- ALTER TABLESPACE
- ALTER TEXT SEARCH CONFIGURATION
- ALTER TEXT SEARCH DICTIONARY
- ALTER TRIGGER
- ALTER TYPE
- ALTER USER
- ALTER USER MAPPING
- ALTER VIEW
- ANALYZE | ANALYSE
- BEGIN
- CALL
- CHECKPOINT
- CLEAN CONNECTION
- CLOSE
- CLUSTER
- COMMENT
- COMMIT | END
- COMMIT PREPARED
- CONNECT BY
- COPY
- CREATE AGGREGATE
- CREATE AUDIT POLICY
- CREATE CAST
- CREATE CLIENT MASTER KEY
- CREATE COLUMN ENCRYPTION KEY
- CREATE DATABASE
- CREATE DATA SOURCE
- CREATE DIRECTORY
- CREATE EXTENSION
- CREATE FOREIGN TABLE
- CREATE FUNCTION
- CREATE GROUP
- CREATE INCREMENTAL MATERIALIZED VIEW
- CREATE INDEX
- CREATE LANGUAGE
- CREATE MASKING POLICY
- CREATE MATERIALIZED VIEW
- CREATE MODEL
- CREATE OPERATOR
- CREATE PACKAGE
- CREATE ROW LEVEL SECURITY POLICY
- CREATE PROCEDURE
- CREATE RESOURCE LABEL
- CREATE RESOURCE POOL
- CREATE ROLE
- CREATE RULE
- CREATE SCHEMA
- CREATE SEQUENCE
- CREATE SERVER
- CREATE SYNONYM
- CREATE TABLE
- CREATE TABLE AS
- CREATE TABLE PARTITION
- CREATE TABLE SUBPARTITION
- CREATE TABLESPACE
- CREATE TEXT SEARCH CONFIGURATION
- CREATE TEXT SEARCH DICTIONARY
- CREATE TRIGGER
- CREATE TYPE
- CREATE USER
- CREATE USER MAPPING
- CREATE VIEW
- CREATE WEAK PASSWORD DICTIONARY
- CURSOR
- DEALLOCATE
- DECLARE
- DELETE
- DO
- DROP AGGREGATE
- DROP AUDIT POLICY
- DROP CAST
- DROP CLIENT MASTER KEY
- DROP COLUMN ENCRYPTION KEY
- DROP DATABASE
- DROP DATA SOURCE
- DROP DIRECTORY
- DROP EXTENSION
- DROP FOREIGN TABLE
- DROP FUNCTION
- DROP GROUP
- DROP INDEX
- DROP LANGUAGE
- DROP MASKING POLICY
- DROP MATERIALIZED VIEW
- DROP MODEL
- DROP OPERATOR
- DROP OWNED
- DROP PACKAGE
- DROP PROCEDURE
- DROP RESOURCE LABEL
- DROP RESOURCE POOL
- DROP ROW LEVEL SECURITY POLICY
- DROP ROLE
- DROP RULE
- DROP SCHEMA
- DROP SEQUENCE
- DROP SERVER
- DROP SYNONYM
- DROP TABLE
- DROP TABLESPACE
- DROP TEXT SEARCH CONFIGURATION
- DROP TEXT SEARCH DICTIONARY
- DROP TRIGGER
- DROP TYPE
- DROP USER
- DROP USER MAPPING
- DROP VIEW
- DROP WEAK PASSWORD DICTIONARY
- EXECUTE
- EXECUTE DIRECT
- EXPLAIN
- EXPLAIN PLAN
- FETCH
- GRANT
- INSERT
- LOCK
- MOVE
- MERGE INTO
- PREDICT BY
- PREPARE
- PREPARE TRANSACTION
- PURGE
- REASSIGN OWNED
- REFRESH INCREMENTAL MATERIALIZED VIEW
- REFRESH MATERIALIZED VIEW
- REINDEX
- RELEASE SAVEPOINT
- RESET
- REVOKE
- ROLLBACK
- ROLLBACK PREPARED
- ROLLBACK TO SAVEPOINT
- SAVEPOINT
- SELECT
- SELECT INTO
- SET
- SET CONSTRAINTS
- SET ROLE
- SET SESSION AUTHORIZATION
- SET TRANSACTION
- SHOW
- SHUTDOWN
- SNAPSHOT
- START TRANSACTION
- TIMECAPSULE TABLE
- TRUNCATE
- UPDATE
- VACUUM
- VALUES
- SQL Reference
- MogDB SQL
- Keywords
- Constant and Macro
- Expressions
- Type Conversion
- Full Text Search
- Introduction
- Tables and Indexes
- Controlling Text Search
- Additional Features
- Parser
- Dictionaries
- Configuration Examples
- Testing and Debugging Text Search
- Limitations
- System Operation
- Controlling Transactions
- DDL Syntax Overview
- DML Syntax Overview
- DCL Syntax Overview
- Appendix
- GUC Parameters
- GUC Parameter Usage
- File Location
- Connection and Authentication
- Resource Consumption
- Parallel Import
- Write Ahead Log
- HA Replication
- Memory Table
- Query Planning
- Error Reporting and Logging
- Alarm Detection
- Statistics During the Database Running
- Load Management
- Automatic Vacuuming
- Default Settings of Client Connection
- Lock Management
- Version and Platform Compatibility
- Faut Tolerance
- Connection Pool Parameters
- MogDB Transaction
- Developer Options
- Auditing
- Upgrade Parameters
- Miscellaneous Parameters
- Wait Events
- Query
- System Performance Snapshot
- Security Configuration
- Global Temporary Table
- HyperLogLog
- Scheduled Task
- Thread Pool
- User-defined Functions
- Backup and Restoration
- Undo
- DCF Parameters Settings
- Flashback
- Rollback Parameters
- Reserved Parameters
- AI Features
- Appendix
- Schema
- Information Schema
- DBE_PERF
- Overview
- OS
- Instance
- Memory
- File
- Object
- STAT_USER_TABLES
- SUMMARY_STAT_USER_TABLES
- GLOBAL_STAT_USER_TABLES
- STAT_USER_INDEXES
- SUMMARY_STAT_USER_INDEXES
- GLOBAL_STAT_USER_INDEXES
- STAT_SYS_TABLES
- SUMMARY_STAT_SYS_TABLES
- GLOBAL_STAT_SYS_TABLES
- STAT_SYS_INDEXES
- SUMMARY_STAT_SYS_INDEXES
- GLOBAL_STAT_SYS_INDEXES
- STAT_ALL_TABLES
- SUMMARY_STAT_ALL_TABLES
- GLOBAL_STAT_ALL_TABLES
- STAT_ALL_INDEXES
- SUMMARY_STAT_ALL_INDEXES
- GLOBAL_STAT_ALL_INDEXES
- STAT_DATABASE
- SUMMARY_STAT_DATABASE
- GLOBAL_STAT_DATABASE
- STAT_DATABASE_CONFLICTS
- SUMMARY_STAT_DATABASE_CONFLICTS
- GLOBAL_STAT_DATABASE_CONFLICTS
- STAT_XACT_ALL_TABLES
- SUMMARY_STAT_XACT_ALL_TABLES
- GLOBAL_STAT_XACT_ALL_TABLES
- STAT_XACT_SYS_TABLES
- SUMMARY_STAT_XACT_SYS_TABLES
- GLOBAL_STAT_XACT_SYS_TABLES
- STAT_XACT_USER_TABLES
- SUMMARY_STAT_XACT_USER_TABLES
- GLOBAL_STAT_XACT_USER_TABLES
- STAT_XACT_USER_FUNCTIONS
- SUMMARY_STAT_XACT_USER_FUNCTIONS
- GLOBAL_STAT_XACT_USER_FUNCTIONS
- STAT_BAD_BLOCK
- SUMMARY_STAT_BAD_BLOCK
- GLOBAL_STAT_BAD_BLOCK
- STAT_USER_FUNCTIONS
- SUMMARY_STAT_USER_FUNCTIONS
- GLOBAL_STAT_USER_FUNCTIONS
- Workload
- Session/Thread
- SESSION_STAT
- GLOBAL_SESSION_STAT
- SESSION_TIME
- GLOBAL_SESSION_TIME
- SESSION_MEMORY
- GLOBAL_SESSION_MEMORY
- SESSION_MEMORY_DETAIL
- GLOBAL_SESSION_MEMORY_DETAIL
- SESSION_STAT_ACTIVITY
- GLOBAL_SESSION_STAT_ACTIVITY
- THREAD_WAIT_STATUS
- GLOBAL_THREAD_WAIT_STATUS
- LOCAL_THREADPOOL_STATUS
- GLOBAL_THREADPOOL_STATUS
- SESSION_CPU_RUNTIME
- SESSION_MEMORY_RUNTIME
- STATEMENT_IOSTAT_COMPLEX_RUNTIME
- LOCAL_ACTIVE_SESSION
- Transaction
- Query
- STATEMENT
- SUMMARY_STATEMENT
- STATEMENT_COUNT
- GLOBAL_STATEMENT_COUNT
- SUMMARY_STATEMENT_COUNT
- GLOBAL_STATEMENT_COMPLEX_HISTORY
- GLOBAL_STATEMENT_COMPLEX_HISTORY_TABLE
- GLOBAL_STATEMENT_COMPLEX_RUNTIME
- STATEMENT_RESPONSETIME_PERCENTILE
- STATEMENT_USER_COMPLEX_HISTORY
- STATEMENT_COMPLEX_RUNTIME
- STATEMENT_COMPLEX_HISTORY_TABLE
- STATEMENT_COMPLEX_HISTORY
- STATEMENT_WLMSTAT_COMPLEX_RUNTIME
- STATEMENT_HISTORY
- Cache/IO
- STATIO_USER_TABLES
- SUMMARY_STATIO_USER_TABLES
- GLOBAL_STATIO_USER_TABLES
- STATIO_USER_INDEXES
- SUMMARY_STATIO_USER_INDEXES
- GLOBAL_STATIO_USER_INDEXES
- STATIO_USER_SEQUENCES
- SUMMARY_STATIO_USER_SEQUENCES
- GLOBAL_STATIO_USER_SEQUENCES
- STATIO_SYS_TABLES
- SUMMARY_STATIO_SYS_TABLES
- GLOBAL_STATIO_SYS_TABLES
- STATIO_SYS_INDEXES
- SUMMARY_STATIO_SYS_INDEXES
- GLOBAL_STATIO_SYS_INDEXES
- STATIO_SYS_SEQUENCES
- SUMMARY_STATIO_SYS_SEQUENCES
- GLOBAL_STATIO_SYS_SEQUENCES
- STATIO_ALL_TABLES
- SUMMARY_STATIO_ALL_TABLES
- GLOBAL_STATIO_ALL_TABLES
- STATIO_ALL_INDEXES
- SUMMARY_STATIO_ALL_INDEXES
- GLOBAL_STATIO_ALL_INDEXES
- STATIO_ALL_SEQUENCES
- SUMMARY_STATIO_ALL_SEQUENCES
- GLOBAL_STATIO_ALL_SEQUENCES
- GLOBAL_STAT_DB_CU
- GLOBAL_STAT_SESSION_CU
- Utility
- REPLICATION_STAT
- GLOBAL_REPLICATION_STAT
- REPLICATION_SLOTS
- GLOBAL_REPLICATION_SLOTS
- BGWRITER_STAT
- GLOBAL_BGWRITER_STAT
- GLOBAL_CKPT_STATUS
- GLOBAL_DOUBLE_WRITE_STATUS
- GLOBAL_PAGEWRITER_STATUS
- GLOBAL_RECORD_RESET_TIME
- GLOBAL_REDO_STATUS
- GLOBAL_RECOVERY_STATUS
- CLASS_VITAL_INFO
- USER_LOGIN
- SUMMARY_USER_LOGIN
- GLOBAL_GET_BGWRITER_STATUS
- GLOBAL_SINGLE_FLUSH_DW_STATUS
- GLOBAL_CANDIDATE_STATUS
- Lock
- Wait Events
- Configuration
- Operator
- Workload Manager
- Global Plancache
- RTO
- Appendix
- DBE_PLDEBUGGER Schema
- Overview
- DBE_PLDEBUGGER.turn_on
- DBE_PLDEBUGGER.turn_off
- DBE_PLDEBUGGER.local_debug_server_info
- DBE_PLDEBUGGER.attach
- DBE_PLDEBUGGER.next
- DBE_PLDEBUGGER.continue
- DBE_PLDEBUGGER.abort
- DBE_PLDEBUGGER.print_var
- DBE_PLDEBUGGER.info_code
- DBE_PLDEBUGGER.step
- DBE_PLDEBUGGER.add_breakpoint
- DBE_PLDEBUGGER.delete_breakpoint
- DBE_PLDEBUGGER.info_breakpoints
- DBE_PLDEBUGGER.backtrace
- DBE_PLDEBUGGER.finish
- DBE_PLDEBUGGER.set_var
- DB4AI Schema
- Tool Reference
- Tool Overview
- Client Tool
- Server Tools
- Tools Used in the Internal System
- gaussdb
- gs_backup
- gs_basebackup
- gs_ctl
- gs_initdb
- gs_install
- gs_install_plugin
- gs_install_plugin_local
- gs_postuninstall
- gs_preinstall
- gs_sshexkey
- gs_tar
- gs_uninstall
- gs_upgradectl
- gs_expansion
- gs_dropnode
- gs_probackup
- gstrace
- kdb5_util
- kadmin.local
- kinit
- klist
- krb5kdc
- kdestroy
- pg_config
- pg_controldata
- pg_recvlogical
- pg_resetxlog
- pg_archivecleanup
- pssh
- pscp
- transfer.py
- FAQ
- System Catalogs and Views Supported by gs_collector
- Extension Reference
- Error Code Reference
- Description of SQL Error Codes
- Third-Party Library Error Codes
- GAUSS-00001 - GAUSS-00100
- GAUSS-00101 - GAUSS-00200
- GAUSS 00201 - GAUSS 00300
- GAUSS 00301 - GAUSS 00400
- GAUSS 00401 - GAUSS 00500
- GAUSS 00501 - GAUSS 00600
- GAUSS 00601 - GAUSS 00700
- GAUSS 00701 - GAUSS 00800
- GAUSS 00801 - GAUSS 00900
- GAUSS 00901 - GAUSS 01000
- GAUSS 01001 - GAUSS 01100
- GAUSS 01101 - GAUSS 01200
- GAUSS 01201 - GAUSS 01300
- GAUSS 01301 - GAUSS 01400
- GAUSS 01401 - GAUSS 01500
- GAUSS 01501 - GAUSS 01600
- GAUSS 01601 - GAUSS 01700
- GAUSS 01701 - GAUSS 01800
- GAUSS 01801 - GAUSS 01900
- GAUSS 01901 - GAUSS 02000
- GAUSS 02001 - GAUSS 02100
- GAUSS 02101 - GAUSS 02200
- GAUSS 02201 - GAUSS 02300
- GAUSS 02301 - GAUSS 02400
- GAUSS 02401 - GAUSS 02500
- GAUSS 02501 - GAUSS 02600
- GAUSS 02601 - GAUSS 02700
- GAUSS 02701 - GAUSS 02800
- GAUSS 02801 - GAUSS 02900
- GAUSS 02901 - GAUSS 03000
- GAUSS 03001 - GAUSS 03100
- GAUSS 03101 - GAUSS 03200
- GAUSS 03201 - GAUSS 03300
- GAUSS 03301 - GAUSS 03400
- GAUSS 03401 - GAUSS 03500
- GAUSS 03501 - GAUSS 03600
- GAUSS 03601 - GAUSS 03700
- GAUSS 03701 - GAUSS 03800
- GAUSS 03801 - GAUSS 03900
- GAUSS 03901 - GAUSS 04000
- GAUSS 04001 - GAUSS 04100
- GAUSS 04101 - GAUSS 04200
- GAUSS 04201 - GAUSS 04300
- GAUSS 04301 - GAUSS 04400
- GAUSS 04401 - GAUSS 04500
- GAUSS 04501 - GAUSS 04600
- GAUSS 04601 - GAUSS 04700
- GAUSS 04701 - GAUSS 04800
- GAUSS 04801 - GAUSS 04900
- GAUSS 04901 - GAUSS 05000
- GAUSS 05001 - GAUSS 05100
- GAUSS 05101 - GAUSS 05200
- GAUSS 05201 - GAUSS 05300
- GAUSS 05301 - GAUSS 05400
- GAUSS 05401 - GAUSS 05500
- GAUSS 05501 - GAUSS 05600
- GAUSS 05601 - GAUSS 05700
- GAUSS 05701 - GAUSS 05800
- GAUSS 05801 - GAUSS 05900
- GAUSS 05901 - GAUSS 06000
- GAUSS 06001 - GAUSS 06100
- GAUSS 06101 - GAUSS 06200
- GAUSS 06201 - GAUSS 06300
- GAUSS 06301 - GAUSS 06400
- GAUSS 06401 - GAUSS 06500
- GAUSS 06501 - GAUSS 06600
- GAUSS 06601 - GAUSS 06700
- GAUSS 06701 - GAUSS 06800
- GAUSS 06801 - GAUSS 06900
- GAUSS 06901 - GAUSS 07000
- GAUSS 07001 - GAUSS 07100
- GAUSS 07101 - GAUSS 07200
- GAUSS 07201 - GAUSS 07300
- GAUSS 07301 - GAUSS 07400
- GAUSS 07401 - GAUSS 07480
- GAUSS 50000 - GAUSS 50999
- GAUSS 51000 - GAUSS 51999
- GAUSS 52000 - GAUSS 52999
- GAUSS 53000 - GAUSS 53699
- Error Log Reference
- System Catalogs and System Views
- Common Faults and Identification Guide
- Common Fault Locating Methods
- Common Fault Locating Cases
- Core Fault Locating
- Permission/Session/Data Type Fault Location
- Service/High Availability/Concurrency Fault Location
- Table/Partition Table Fault Location
- File System/Disk/Memory Fault Location
- After You Run the du Command to Query Data File Size In the XFS File System, the Query Result Is Greater than the Actual File Size
- File Is Damaged in the XFS File System
- Insufficient Memory
- "Error:No space left on device" Is Displayed
- When the TPC-C is running and a disk to be injected is full, the TPC-C stops responding
- Disk Space Usage Reaches the Threshold and the Database Becomes Read-only
- SQL Fault Location
- Index Fault Location
- Source Code Parsing
- FAQs
- Glossary
TPCC Performance Tuning Guide
This section introduces the TPCC tesing method of the MogDB database and key system-level tuning depended by the database for reaching its optimal tpmC performance.
Hardware Environment
-
Server
- The optimal TPC-C result can be achieved by using one four-path KUNPENG servers (256 CPUs, 512 to 1024 GB memory) and one two-path KUNPENG server.
- In normal conditions, two two-path KUNPENG servers can be used (128 CPUs, 512 to 1024 GB memory).
- Two x86 servers can also be used. But the test guide does not use NUMA optimization.
-
Hard disk
- It is suggested to use two NVME flash cards on the database client.
- Three to four SSDs are used.
-
NIC
- Hi1822 NICs matched with the KUNPENG server are used.
- It is suggested to use gigabit NICs on x86 servers.
Software Environment
-
Database: MogDB 2.1.1
-
TPCC client: Use TiDB-optimized BenchmarkSQL 5.0 (https://github.com/pingcap/benchmarksql)
-
Dependencies
Software Suggested Version numactl - JDK 1.8.0-242 Ant 1.10.5 htop -
Test Procedure
-
Install MogDB. For details, see Installing MogDB for single-instance deployment.
-
Initialize parameter settings and restart the database to make parameters take effect. For details, see Recommended Parameter Settings.
-
Download the TPC-C standard test tool BenchmarkSQL 5.0.
[root@node151 ~]# git clone -b 5.0-mysql-support-opt-2.1 https://github.com/pingcap/benchmarksql.git Cloning into 'tpcc-mysql'... remote: Enumerating objects: 106, done. remote: Total 106 (delta 0), reused 0 (delta 0), pack-reused 106 Receiving objects: 100% (106/106), 64.46 KiB | 225.00 KiB/s, done. Resolving deltas: 100% (30/30), done. -
Download and install the JDK and Ant dependencies.
[root@node151 ~]# rpm -ivh ant-1.10.5-6.oe1.noarch.rpm jdk-8u281-linux-aarch64.rpm --force --nodeps warning: ant-1.10.5-6.oe1.noarch.rpm: Header V3 RSA/SHA1 Signature, key ID b25e7f66: NOKEY warning: jdk-8u281-linux-aarch64.rpm: Header V3 RSA/SHA256 Signature, key ID ec551f03: NOKEY Verifying... ################################# [100%] Preparing... ################################# [100%] Updating / installing... 1:jdk1.8-2000:1.8.0_281-fcs ################################# [ 50%] Unpacking JAR files... tools.jar... rt.jar... jsse.jar... charsets.jar... localedata.jar... 2:ant-0:1.10.5-6.oe1 ################################# [100%] -
Configure JAVA environment variables.
[root@node151 ~]# tail -3 /root/.bashrc export JAVA_HOME=/usr/java/jdk1.8.0_281-aarch64 export PATH=$JAVA_HOME/bin:$PATH export CLASSPATH=.:JAVA_HOME/lib:$BENCHMARKSQLPATH/run/ojdbc7.jar -
Open the BenchmarkSQL directory and run the ant command to compile source files.
After successful compilation, two directories \build and \dist will generate.
[root@node151 benchmarksql-5.0-mysql-support-opt-2.1]# pwd /tmp/benchmarksql-5.0-mysql-support-opt-2.1 [root@node151 benchmarksql-5.0-mysql-support-opt-2.1]# ant Buildfile: /tmp/benchmarksql-5.0-mysql-support-opt-2.1/build.xml init: [mkdir] Created dir: /tmp/benchmarksql-5.0-mysql-support-opt-2.1/build compile: [javac] Compiling 12 source files to /tmp/benchmarksql-5.0-mysql-support-opt-2.1/build dist: [mkdir] Created dir: /tmp/benchmarksql-5.0-mysql-support-opt-2.1/dist [jar] Building jar: /tmp/benchmarksql-5.0-mysql-support-opt-2.1/dist/BenchmarkSQL-5.0.jar BUILD SUCCESSFUL Total time: 1 second -
Based on your system architecture, download the corresponding JDBC driver to the lib/postgresql folder in the BenchmarkSQL directory, decompress it, and delete the self-contained JDBC driver.
[root@node151 postgres]# pwd /tmp/benchmarksql-5.0-mysql-support-opt-2.1/lib/postgres/ [root@node151 postgres]# ls openGauss-2.0.0-JDBC.tar.gz postgresql-9.3-1102.jdbc41.jar [root@node151 postgres]# rm -f postgresql-9.3-1102.jdbc41.jar [root@node151 postgres]# tar -xf openGauss-2.0.0-JDBC.tar.gz [root@node151 postgres]# ls openGauss-2.0.0-JDBC.tar.gz postgresql.jar -
In the database, create database tpcc_db and user tpcc.
[omm@node151 ~]$ gsql -d postgres -p 26000 -r postgres=# create database tpcc_db; CREATE DATABASE postgres=# \q [omm@node151 ~]$ gsql -d tpcc_db -p 26000 -r tpcc_db=# CREATE USER tpcc WITH PASSWORD "tpcc@123"; CREATE ROLE tpcc_db=# GRANT ALL ON schema public TO tpcc; GRANT tpcc_db=# ALTER User tpcc sysadmin; ALTER ROLE -
On the client, open the run folder in the BenchmarkSQL directory, edit the benchmarksql configuration file, and modify test parameters, including database user name, password, IP address, port, and database.
[root@node151 db1]# cd /tmp/benchmarksql-5.0-mysql-support-opt-2.1/run [root@node151 run]# vim props.mogdb db=postgres driver=org.postgresql.Driver conn=jdbc:postgresql://172.16.0.176:26000/tpcc_db?prepareThreshold=1&batchMode=on&fetchsize=10&loggerLevel=off #Modify the connection character string, including IP address, port, and database. user=tpcc #User name password=tpcc@123 #Password warehouses=100 #Number of warehouses terminals=300 #Number of terminals runMins=5 #Running time runTxnsPerTerminal=0 loadWorkers=100 limitTxnsPerMin=0 terminalWarehouseFixed=false newOrderWeight=45 paymentWeight=43 orderStatusWeight=4 deliveryWeight=4 stockLevelWeight=4 -
Initialize data.
[root@node151 run]# sh runDatabaseBuild.sh props.mogdb # ------------------------------------------------------------ # Loading SQL file ./sql.common/tableCreates.sql # ------------------------------------------------------------ create table bmsql_config ( cfg_name varchar(30) primary key, cfg_value varchar(50) ); ...... # ------------------------------------------------------------ # Loading SQL file ./sql.postgres/buildFinish.sql # ------------------------------------------------------------ -- ---- -- Extra commands to run after the tables are created, loaded, -- indexes built and extra's created. -- PostgreSQL version. -- ---- vacuum analyze; -
Modify the path of funcs.sh in the runBenchmark.sh file to the actual path.
[root@node151 run]# vim runBenchmark.sh #!/usr/bin/env bash if [ $# -ne 1 ] ; then echo "usage: $(basename $0) PROPS_FILE" >&2 exit 2 fi SEQ_FILE="./.jTPCC_run_seq.dat" if [ ! -f "${SEQ_FILE}" ] ; then echo "0" > "${SEQ_FILE}" fi SEQ=$(expr $(cat "${SEQ_FILE}") + 1) || exit 1 echo "${SEQ}" > "${SEQ_FILE}" source /tmp/benchmarksql-5.0-mysql-support-opt-2.1/run/funcs.sh $1 #Modify the path to the actual path in which the file is stored. setCP || exit 1 myOPTS="-Dprop=$1 -DrunID=${SEQ}" java -cp "$myCP" $myOPTS jTPCC -
Start the test. The tpmC part shows the test result which is stored in runLog_mmdd-hh24miss.log.
[root@node151 run]# sh runBenchmark.sh props.mogdb| tee runLog_`date +%m%d-%H%M%S`.log

...

15:08:26,663 [Thread-16] INFO   jTPCC : Term-00, Measured tpmC (NewOrders) = 106140.46
15:08:26,663 [Thread-16] INFO   jTPCC : Term-00, Measured tpmTOTAL = 235800.39
15:08:26,664 [Thread-16] INFO   jTPCC : Term-00, Session Start     = 2021-08-04 15:03:26
15:08:26,664 [Thread-16] INFO   jTPCC : Term-00, Session End       = 2021-08-04 15:08:26
15:08:26,664 [Thread-16] INFO   jTPCC : Term-00, Transaction Count = 1179449
15:08:26,664 [Thread-16] INFO   jTPCC : executeTime[Payment]=29893614
15:08:26,664 [Thread-16] INFO   jTPCC : executeTime[Order-Status]=2564424
15:08:26,664 [Thread-16] INFO   jTPCC : executeTime[Delivery]=4438389
15:08:26,664 [Thread-16] INFO   jTPCC : executeTime[Stock-Level]=4259325
15:08:26,664 [Thread-16] INFO   jTPCC : executeTime[New-Order]=48509926
Adjust props.mogdb or use several props files and perform the test several times as required.
-
To prevent generating large volume of data due to multiple tests from affecting performance, clear the data and then start the test.
[root@node151 run]# sh runDatabaseDestroy.sh props.mogdb
# ------------------------------------------------------------
# Loading SQL file ./sql.common/tableDrops.sql
# ------------------------------------------------------------
drop table bmsql_config;
drop table bmsql_new_order;
drop table bmsql_order_line;
drop table bmsql_oorder;
drop table bmsql_history;
drop table bmsql_customer;
drop table bmsql_stock;
drop table bmsql_item;
drop table bmsql_district;
drop table bmsql_warehouse;
drop sequence bmsql_hist_id_seq;
During the tuning, you can execute the build operation once and execute the run operation multiple times. However, in the formal test, you are advised to perform the build, run, and destroy operations in sequence every time.
Tuning
1. Host Optimization (KUNPENG Exclusive)
Adjust BIOS.
- Choose BIOS > Advanced > MISC Config, and set Support Smmu to Disabled.
- Choose BIOS > Advanced > MISC Config, and set CPU Prefetching Configuration to Disabled.
- Choose BIOS > Advanced > Memory Config, and set Die Interleaving to Disabled.
2. OS Optimization (KUNPENG Exclusive)
-
Change PAGESIZE of the OS kernel to 64KB (default value)
-
Disable irqbalance.
systemctl stop irqbalance -
Adjust numa_balance.
echo 0 > /proc/sys/kernel/numa_balancing -
Adjust the transparent huge page.
echo 'never' > /sys/kernel/mm/transparent_hugepage/enabled echo 'never' > /sys/kernel/mm/transparent_hugepage/defrag -
Configure the scheduling mechanism of the NVME disk IO queue.
echo none > /sys/block/nvmen/queue/scheduler
3. File System Configuration
-
The format is xfs, and the database size is 8 KB.
mkfs.xfs -b size=8192 /dev/nvme0n1 -f
4. Network Configuration
-
NIC multi-interrupt queue setting
Downlaod IN500_solution_5.1.0.SPC401.zip and install hinicadm.
[root@node151 fc]# pwd /root/IN500_solution_5/tools/linux_arm/fc [root@node151 fc]# rpm -ivh hifcadm-2.4.1.0-1.aarch64.rpm Verifying... ################################# [100%] Preparing... ################################# [100%] package hifcadm-2.4.1.0-1.aarch64 is already installed [root@node151 fc]# -
Modify the maximum number of multi-interrupt queues supported by the system.
[root@node151 config]# pwd
/root/IN500_solution_5/tools/linux_arm/nic/config
[root@node151 config]# ./hinicconfig hinic0 -f std_sh_4x25ge_dpdk_cfg_template0.ini
[root@node151 config]# reboot
[root@node151 config]# ethtool -L enp3s0 combined 48
The tuning value varies depending on the platform and application. For the current platform of 128 cores, the tuning value is 12 on the server client and 48 on the client.
-
For interrupt tuning, enable the tso, lro, gro, and gso features.
ethtool -K enp3s0 tso on ethtool -K enp3s0 lro on ethtool -K enp3s0 gro on ethtool -K enp3s0 gso on -
Confirm and update the NIC firmware.
[root@node151 ~]# ethtool -i enp3s0
driver: hinic
version: 2.3.2.11
firmware-version: 2.4.1.0
expansion-rom-version:
bus-info: 0000:03:00.0
supports-statistics: yes
supports-test: yes
supports-eeprom-access: no
supports-register-dump: no
supports-priv-flags: no
The NIC firmware version is 2.4.1.0.
-
Update the NIC firmware.
[root@node151 cfg_data_nic_prd_1h_4x25G]# pwd
/root/IN500_solution_5/firmware/update_bin/cfg_data_nic_prd_1h_4x25G
[root@node151 cfg_data_nic_prd_1h_4x25G]# hinicadm updatefw -i enp3s0 -f /root/IN500_solution_5/firmware/update_bin/cfg_data_nic_prd_1h_4x25G/Hi1822_nic_prd_1h_4x25G.bin
Restart the server and confirm that the NIC firmware version is updated to 2.4.1.0.
5. Core Binding on the Database Server and Client Server
-
NUMA binding tuning on KUNPENG servers (128 cores)
-
Install NUMA on the database server and client server.
yum install numa -yInstall the NIC driver on the database server and client server. For details, see the Network Configuration section.
-
Database server
cp `find /opt -name "bind*.sh"|head -1 ` /root
sh /root/bind_net_irq.sh 12
Set database parameters:
thread_pool_attr = '345,4,(cpubind:1-28,32-60,64-92,96-124)'
enable_thread_pool = on
Stop the database. Change the database start command to the following:
numactl -C 1-28,32-60,64-92,96-124 mogdb --single_node -D /opt/data/db2/ -p 26000 & -
Client server Copy /root/bind_net_irq.sh to the client server.
sh /root/bind_net_irq.sh 48Change the benchmark start command to the following:
numactl -C 0-19,32-51,64-83,96-115 sh runBenchmark.sh props.mog
-
-
NUMA binding tuning on KUNPENG servers (256 cores)
-
Install NUMA on the database server and client server.
yum install numa* -yInstall the NIC driver on the database server and client server. For details, see the Network Configuration section.
-
Database server
cp `find /opt -name "bind*.sh"|head -1 ` /root
sh /root/bind_net_irq.sh 24
Set database parameters:
thread_pool_attr = '696,4,(cpubind:1-28,32-60,64-92,96-124,128-156,160-188,192-220,224-252)'
enable_thread_pool = on
Stop the database Change the database start command to the following:
numactl -C 1-28,32-60,64-92,96-124,128-156,160-188,192-220,224-252 mogdb --single_node -D /opt/data/db2/ -p 26000 & -
Client server Copy /root/bind_net_irq.sh to the client server.
sh /root/bind_net_irq.sh 48Change the benchmark start command to the following:
numactl -C 0-19,32-51,64-83,96-115 sh runBenchmark.sh props.mog
-
6. Database Parameter Tuning (Commonly Used Method)
Modify postgresql.conf in PGDATA and restart the database.
max_connections = 4096
allow_concurrent_tuple_update = true
audit_enabled = off
cstore_buffers =16MB
enable_alarm = off
enable_codegen = false
enable_data_replicate = off
full_page_writes = off
max_files_per_process = 100000
max_prepared_transactions = 2048
shared_buffers = 350GB
use_workload_manager = off
wal_buffers = 1GB
work_mem = 1MB
transaction_isolation = 'read committed'
default_transaction_isolation = 'read committed'
synchronous_commit = on
fsync = on
maintenance_work_mem = 2GB
vacuum_cost_limit = 2000
autovacuum = on
autovacuum_mode = vacuum
autovacuum_vacuum_cost_delay =10
xloginsert_locks = 48
update_lockwait_timeout =20min
enable_mergejoin = off
enable_nestloop = off
enable_hashjoin = off
enable_bitmapscan = on
enable_material = off
wal_log_hints = off
log_duration = off
checkpoint_timeout = 15min
autovacuum_vacuum_scale_factor = 0.1
autovacuum_analyze_scale_factor = 0.02
enable_save_datachanged_timestamp =FALSE
log_timezone = 'PRC'
timezone = 'PRC'
lc_messages = 'C'
lc_monetary = 'C'
lc_numeric = 'C'
lc_time = 'C'
enable_double_write = on
enable_incremental_checkpoint = on
enable_opfusion = on
numa_distribute_mode = 'all'
track_activities = off
enable_instr_track_wait = off
enable_instr_rt_percentile = off
track_counts =on
track_sql_count = off
enable_instr_cpu_timer = off
plog_merge_age = 0
session_timeout = 0
enable_instance_metric_persistent = off
enable_logical_io_statistics = off
enable_user_metric_persistent =off
enable_xlog_prune = off
enable_resource_track = off
instr_unique_sql_count = 0
enable_beta_opfusion = on
enable_thread_pool = on
#0 core is used for binding the walwriter thread to the core.
enable_partition_opfusion=off
wal_writer_cpu=0
xlog_idle_flushes_before_sleep = 500000000
max_io_capacity = 2GB
dirty_page_percent_max = 0.1
candidate_buf_percent_target = 0.7
bgwriter_delay = 500
pagewriter_sleep = 30
checkpoint_segments =10240
advance_xlog_file_num = 100
autovacuum_max_workers = 20
autovacuum_naptime = 5s
bgwriter_flush_after = 256kB
data_replicate_buffer_size = 16MB
enable_stmt_track = off
remote_read_mode=non_authentication
wal_level = archive
hot_standby = off
hot_standby_feedback = off
client_min_messages = ERROR
log_min_messages = FATAL
enable_asp = off
enable_bbox_dump = off
enable_ffic_log = off
enable_twophase_commit = off
minimum_pool_size = 200
wal_keep_segments = 1025
incremental_checkpoint_timeout = 5min
max_process_memory = 12GB
vacuum_cost_limit = 10000
xloginsert_locks = 8
wal_writer_delay = 100
wal_file_init_num = 30
wal_level=minimal
max_wal_senders=0
fsync=off
synchronous_commit = off
enable_indexonlyscan=on
thread_pool_attr = '345,4,(cpubind:1-28,32-60,64-92,96-124)'
enable_page_lsn_check = off
enable_double_write = off
7. BenchmarkSQL Tuning
-
Connection string
conn=jdbc:postgresql://10.10.10.40:26000/tpcc?prepareThreshold=1&batchMode=on&fetchsize=10&loggerLevel=off -
Modify the file to distribute the data. Adjust FILLFACTOR and partition data disks.
[root@node151 ~]# ls benchmarksql-5.0-mysql-support-opt-2.1/run/sql.common/tableCreates.sql
benchmarksql-5.0-mysql-support-opt-2.1/run/sql.common/tableCreates.sql
[root@node151 sql.common]# cat tableCreates.sql
CREATE TABLESPACE example2 relative location 'tablespace2';
CREATE TABLESPACE example3 relative location 'tablespace3';

create table bmsql_config (
  cfg_name    varchar(30),
  cfg_value   varchar(50)
);

create table bmsql_warehouse (
  w_id        integer   not null,
  w_ytd       decimal(12,2),
  w_tax       decimal(4,4),
  w_name      varchar(10),
  w_street_1  varchar(20),
  w_street_2  varchar(20),
  w_city      varchar(20),
  w_state     char(2),
  w_zip       char(9)
) WITH (FILLFACTOR=80);

create table bmsql_district (
  d_w_id       integer       not null,
  d_id         integer       not null,
  d_ytd        decimal(12,2),
  d_tax        decimal(4,4),
  d_next_o_id  integer,
  d_name       varchar(10),
  d_street_1   varchar(20),
  d_street_2   varchar(20),
  d_city       varchar(20),
  d_state      char(2),
  d_zip        char(9)
 ) WITH (FILLFACTOR=80);

create table bmsql_customer (
  c_w_id         integer        not null,
  c_d_id         integer        not null,
  c_id           integer        not null,
  c_discount     decimal(4,4),
  c_credit       char(2),
  c_last         varchar(16),
  c_first        varchar(16),
  c_credit_lim   decimal(12,2),
  c_balance      decimal(12,2),
  c_ytd_payment  decimal(12,2),
  c_payment_cnt  integer,
  c_delivery_cnt integer,
  c_street_1     varchar(20),
  c_street_2     varchar(20),
  c_city         varchar(20),
  c_state        char(2),
  c_zip          char(9),
  c_phone        char(16),
  c_since        timestamp,
  c_middle       char(2),
  c_data         varchar(500)
) WITH (FILLFACTOR=80) tablespace example2;

create sequence bmsql_hist_id_seq;

create table bmsql_history (
  hist_id  integer,
  h_c_id   integer,
  h_c_d_id integer,
  h_c_w_id integer,
  h_d_id   integer,
  h_w_id   integer,
  h_date   timestamp,
  h_amount decimal(6,2),
  h_data   varchar(24)
) WITH (FILLFACTOR=80);

create table bmsql_new_order (
  no_w_id  integer   not null,
  no_d_id  integer   not null,
  no_o_id  integer   not null
) WITH (FILLFACTOR=80);

create table bmsql_oorder (
  o_w_id       integer      not null,
  o_d_id       integer      not null,
  o_id         integer      not null,
  o_c_id       integer,
  o_carrier_id integer,
  o_ol_cnt     integer,
  o_all_local  integer,
  o_entry_d    timestamp
) WITH (FILLFACTOR=80);

create table bmsql_order_line (
  ol_w_id         integer   not null,
  ol_d_id         integer   not null,
  ol_o_id         integer   not null,
  ol_number       integer   not null,
  ol_i_id         integer   not null,
  ol_delivery_d   timestamp,
  ol_amount       decimal(6,2),
  ol_supply_w_id  integer,
  ol_quantity     integer,
  ol_dist_info    char(24)
) WITH (FILLFACTOR=80);

create table bmsql_item (
  i_id     integer      not null,
  i_name   varchar(24),
  i_price  decimal(5,2),
  i_data   varchar(50),
  i_im_id  integer
);

create table bmsql_stock (
  s_w_id       integer       not null,
  s_i_id       integer       not null,
  s_quantity   integer,
  s_ytd        integer,
  s_order_cnt  integer,
  s_remote_cnt integer,
  s_data       varchar(50),
  s_dist_01    char(24),
  s_dist_02    char(24),
  s_dist_03    char(24),
  s_dist_04    char(24),
  s_dist_05    char(24),
  s_dist_06    char(24),
  s_dist_07    char(24),
  s_dist_08    char(24),
  s_dist_09    char(24),
  s_dist_10    char(24)
) WITH (FILLFACTOR=80) tablespace example3;
8. Database File Location Tuning (Commonly Used Method)
Place the primary, xlog, example2, and example3 directories in multiple underlying disks to avoid IO bottleneck. If there are only two high-performance disks, preferably move the xlog directory. If there are three high-performance disks, move the xlog and example2 directories. The example is as follows:
PGDATA=/opt/data/mogdb
cd $PGDATA
mv pg_xlog /tpccdir1
ln -s /tpccdir1/pg_xlog .
cd pg_location
mv tablespace2 /tpccdir2
ln -s /tpccdir2/tablespace2 .
mv tablespace3 /tpccdir3
ln -s /tpccdir3/tablespace3 .
9. Observation of System Resource Tools
-
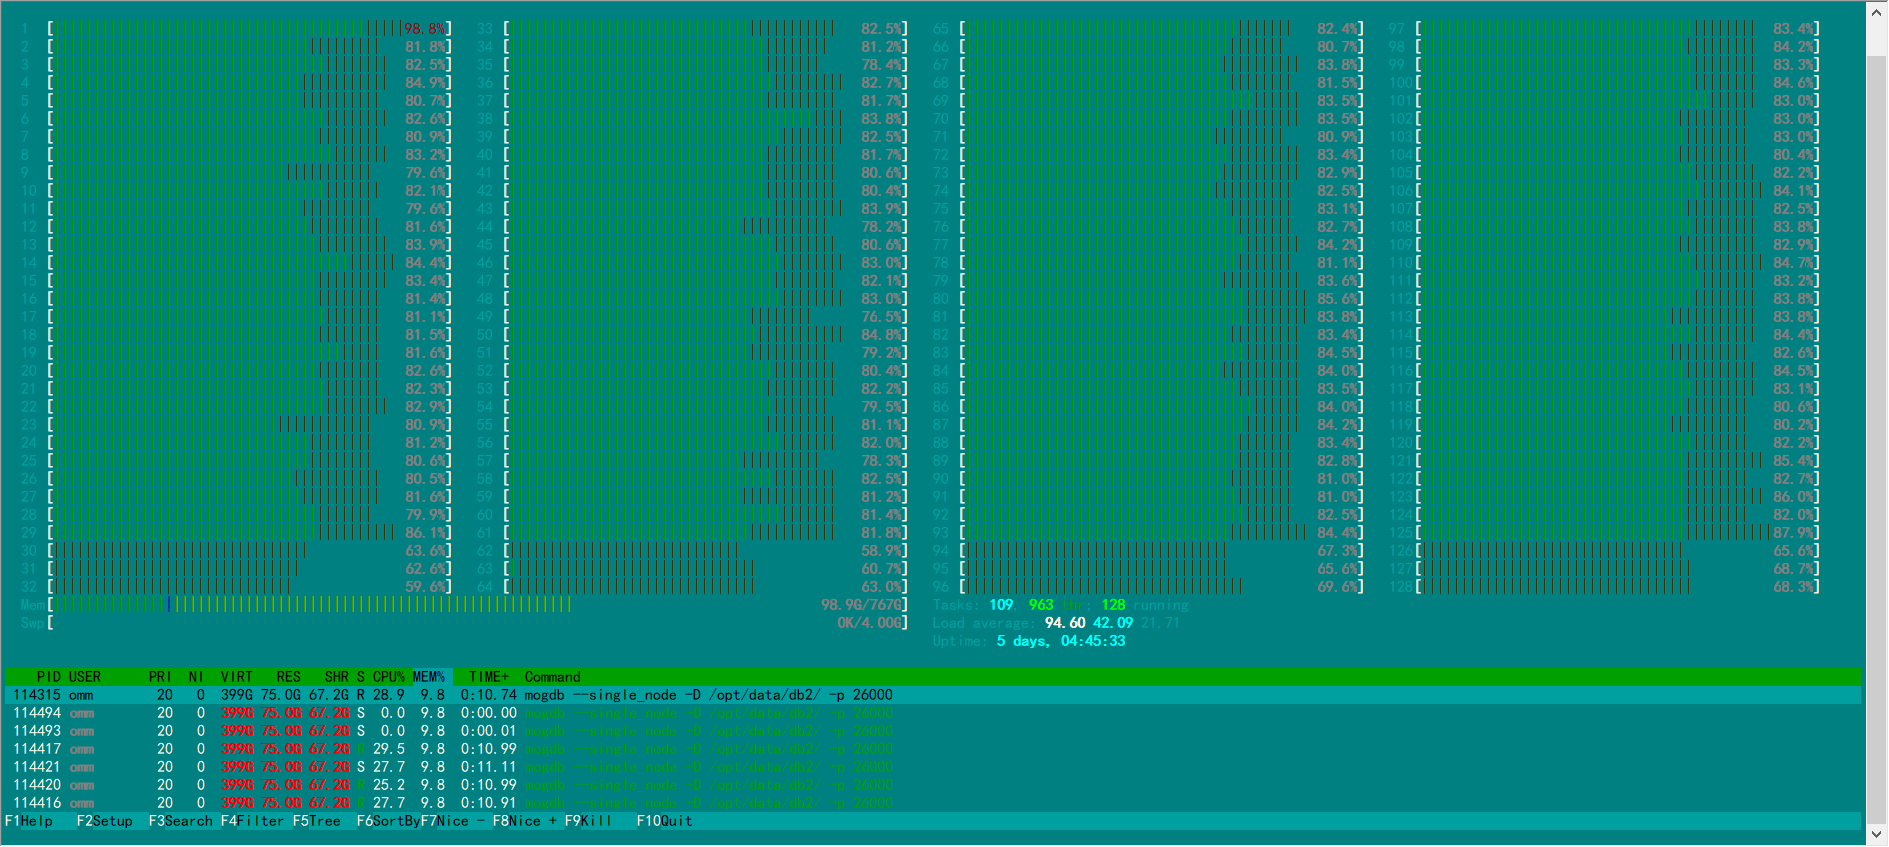
htop is used to observe the CPU usage. For the ARM platform, the compilation needs to be performed from source code.
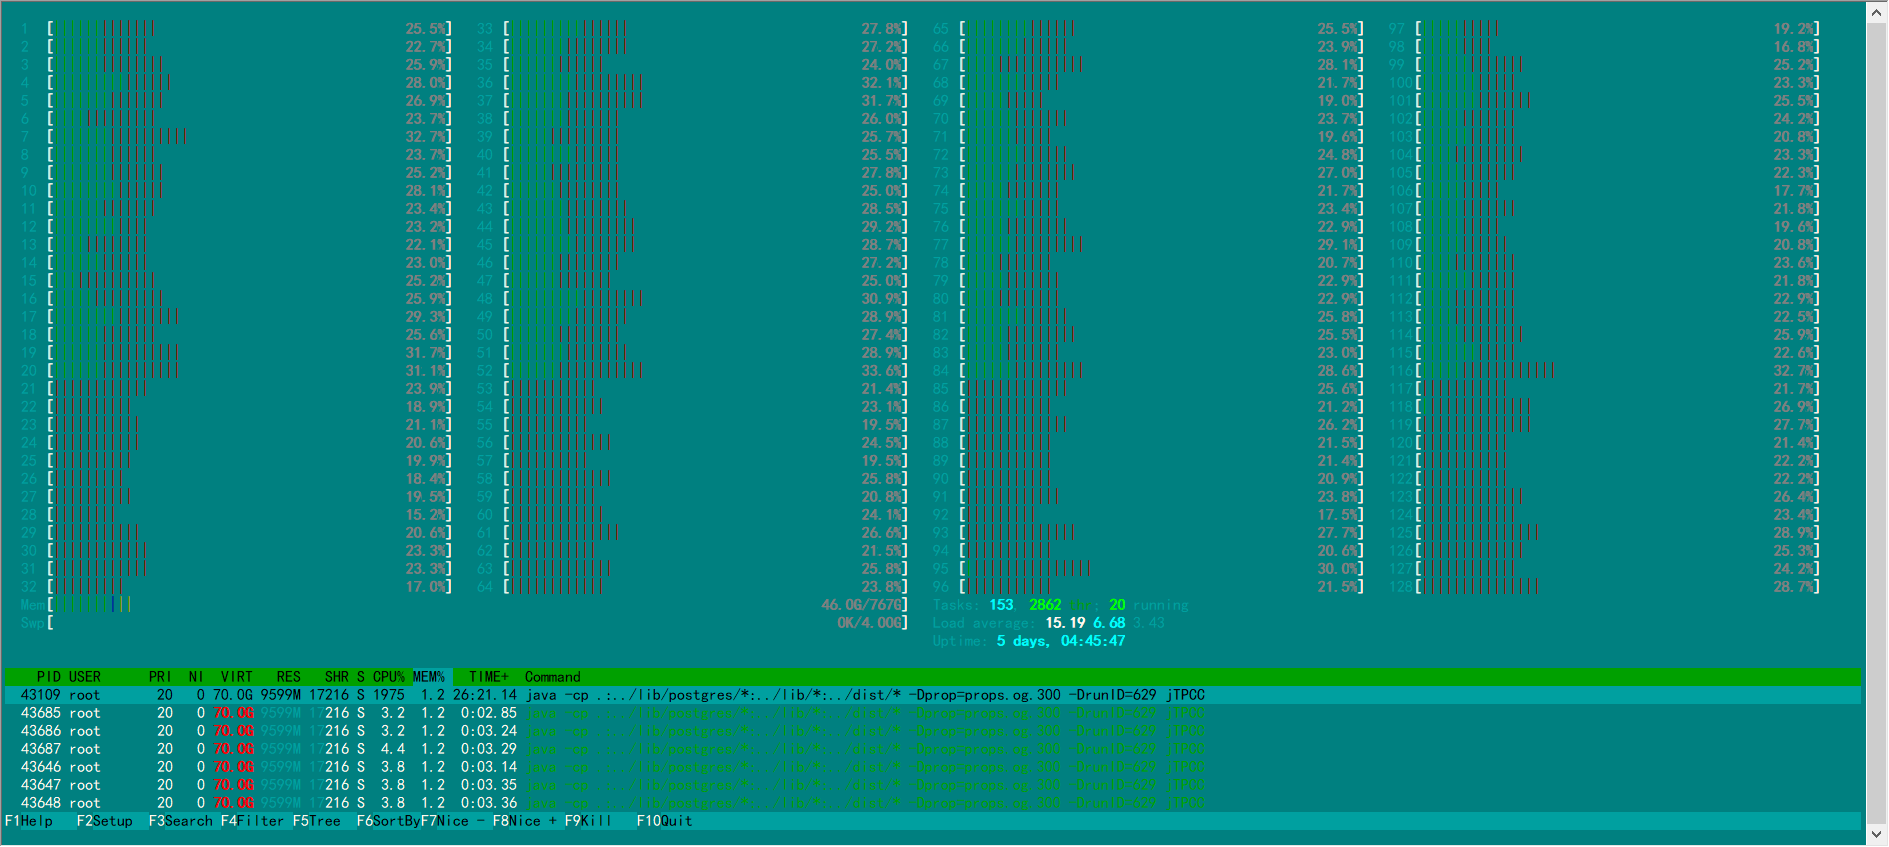
By using htop to monitor the CPU usage on the database server and client server, it is found that the CPU usage of each service is very high, reaching more than 90% under the optimal performance test. If the CPU usage of any service does not reach the standard, the core-binding mode may be incorrect or other problem may occur. It needs to be located and modified.
-
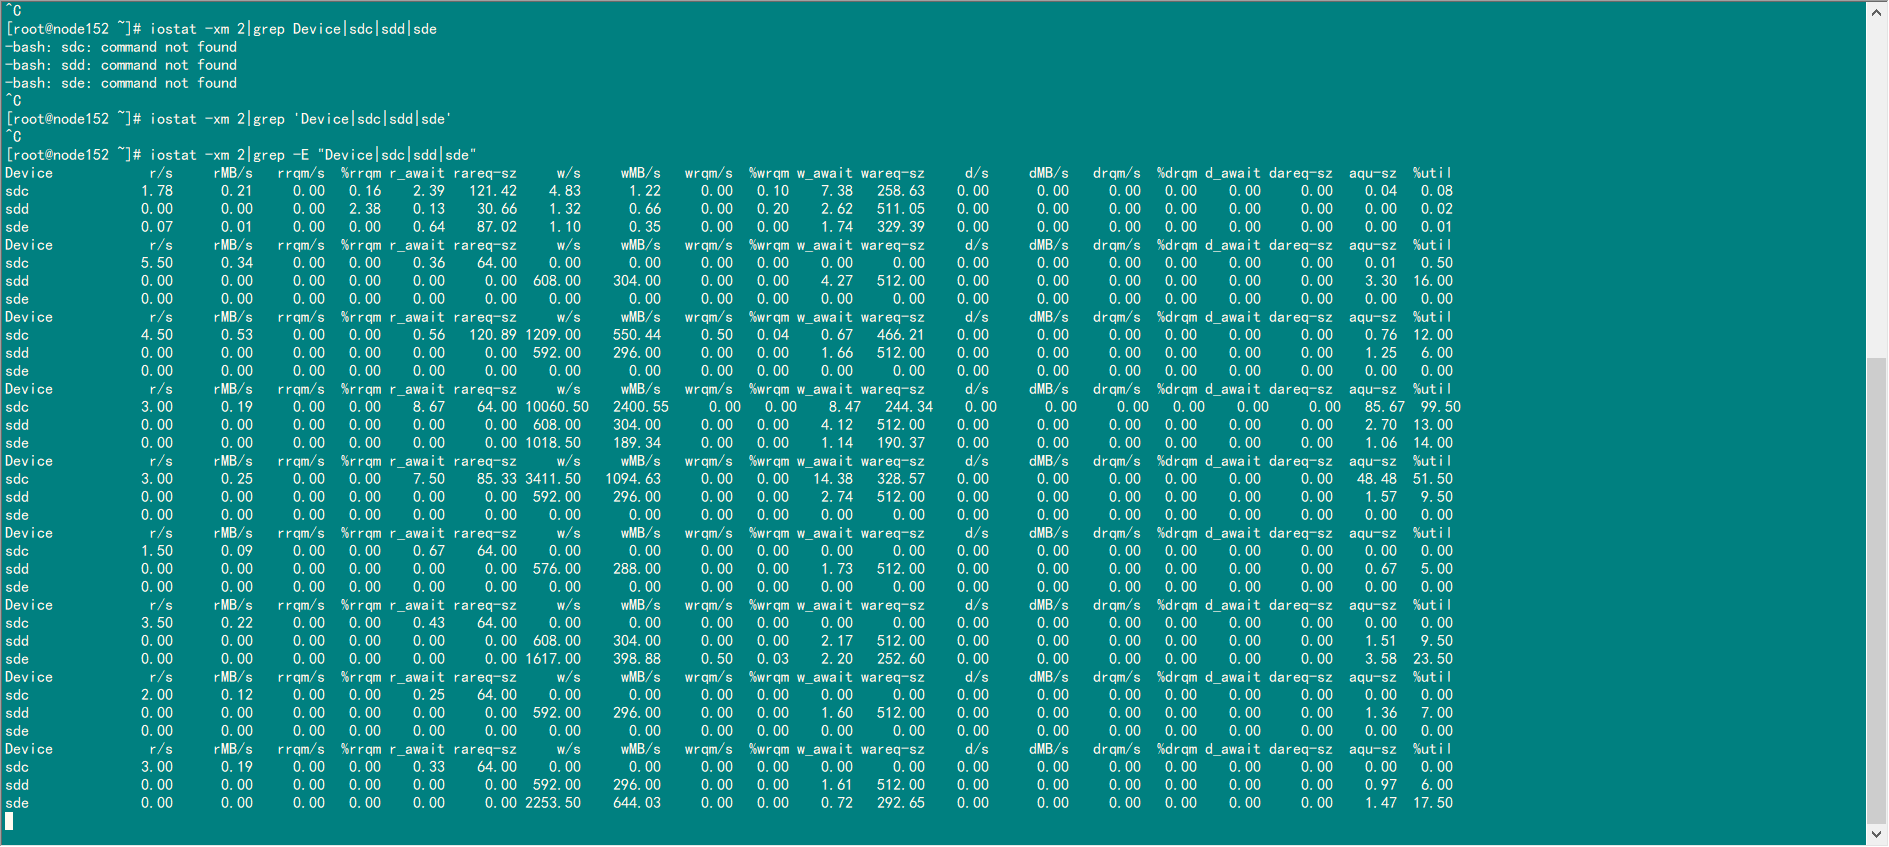
iostat is used to check the system IO usage.
-
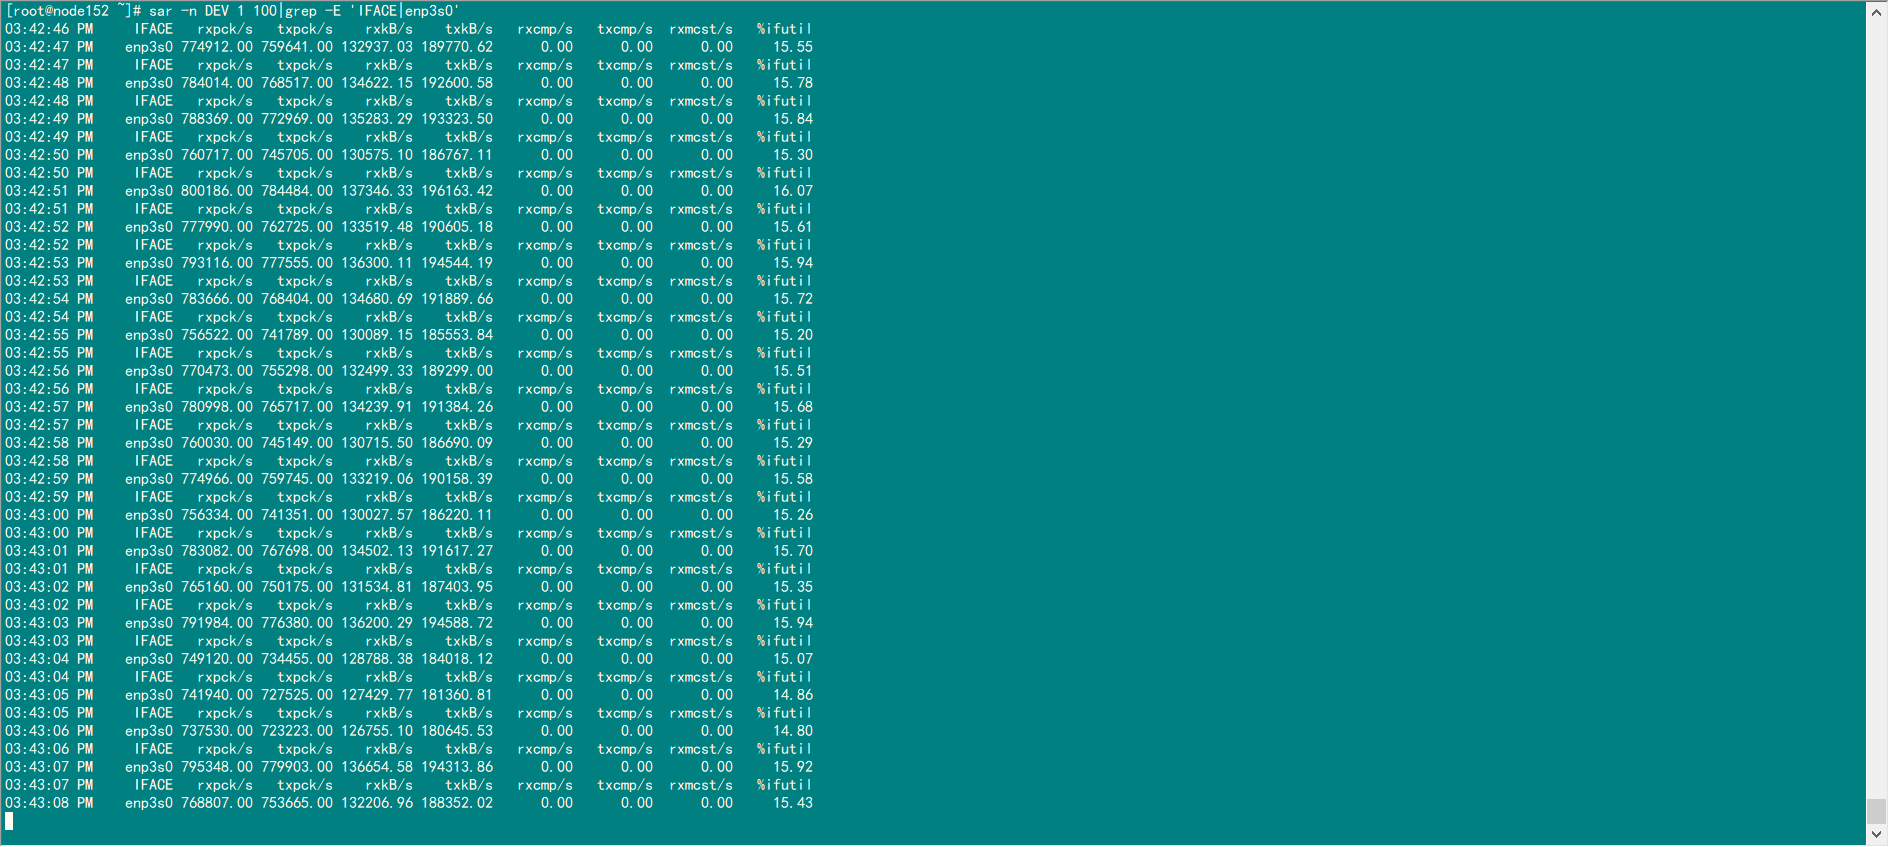
sar is used to check the network usage.
-
nmon is used to monitor the overall system resources.
Screenshots of part of data
-
htop result of the database server
-
htop result of the client server
-
iostat is used to check the system IO usage.
-
sar is used to check the network usage.
Ideal Results
4-path KUNPENG server with 256 CPUs, 1000 warehouses, and 500 terminals: 250W tpmC
2-path KUNPENG server with 100 warehouses and 100 terminals: 90W tpmC
2-path KUNPENG server with 100 warehouses and 300 terminals: 140W tpmC