- About MogDB
- MogDB Introduction
- Comparison Between MogDB and openGauss
- MogDB Release Note
- High Availability and Performance
- Open Source Components
- Usage Limitations
- Terms of Use
- Quick Start
- Installation Guide
- Container Installation
- Standard Installation
- Installation Overview
- Preparing for Installation
- Installing the MogDB
- Verifying the Installation
- Uninstalling the MogDB
- Administrator Guide
- Routine Maintenance
- Primary and Standby Management
- MogHA Management
- MOT Engine
- Introducing MOT
- Using MOT
- Concepts of MOT
- Appendix
- Column-store Tables Management
- Backup and Restoration
- Importing and Exporting Data
- Importing Data
- Exporting Data
- Upgrade Guide
- Common Fault Locating Cases
- Core Fault Locating
- When the TPC-C is running and a disk to be injected is full, the TPC-C stops responding
- Standby Node in the Need Repair (WAL) State
- Insufficient Memory
- Service Startup Failure
- "Error:No space left on device" Is Displayed
- After You Run the du Command to Query Data File Size In the XFS File System, the Query Result Is Greater than the Actual File Size
- File Is Damaged in the XFS File System
- Primary Node Is Hung in Demoting During a Switchover
- Disk Space Usage Reaches the Threshold and the Database Becomes Read-only
- Slow Response to a Query Statement
- Analyzing the Status of a Query Statement
- Forcibly Terminating a Session
- Analyzing Whether a Query Statement Is Blocked
- Low Query Efficiency
- "Lock wait timeout" Is Displayed When a User Executes an SQL Statement
- Table Size Does not Change After VACUUM FULL Is Executed on the Table
- An Error Is Reported When the Table Partition Is Modified
- Different Data Is Displayed for the Same Table Queried By Multiple Users
- When a User Specifies Only an Index Name to Modify the Index, A Message Indicating That the Index Does Not Exist Is Displayed
- Reindexing Fails
- An Error Occurs During Integer Conversion
- "too many clients already" Is Reported or Threads Failed To Be Created in High Concurrency Scenarios
- B-tree Index Faults
- Security Guide
- Database Security Management
- Performance Tuning
- System Optimization
- SQL Optimization
- WDR Snapshot Schema
- Developer Guide
- Application Development Guide
- Development Specifications
- Development Based on JDBC
- Overview
- JDBC Package, Driver Class, and Environment Class
- Development Process
- Loading the Driver
- Connecting to a Database
- Connecting to the Database (Using SSL)
- Running SQL Statements
- Processing Data in a Result Set
- Closing a Connection
- Example: Common Operations
- Example: Retrying SQL Queries for Applications
- Example: Importing and Exporting Data Through Local Files
- Example 2: Migrating Data from a MY Database to MogDB
- Example: Logic Replication Code
- JDBC Interface Reference
- Development Based on ODBC
- Development Based on libpq
- Commissioning
- Appendices
- Stored Procedure
- User Defined Functions
- Application Development Guide
- Tool Reference
- System Catalogs and System Views
- Overview of System Catalogs and System Views
- System Catalogs
- GS_CLIENT_GLOBAL_KEYS
- GS_CLIENT_GLOBAL_KEYS_ARGS
- GS_COLUMN_KEYS
- GS_COLUMN_KEYS_ARGS
- GS_ENCRYPTED_COLUMNS
- GS_OPT_MODEL
- GS_WLM_INSTANCE_HISTORY
- GS_WLM_OPERATOR_INFO
- GS_WLM_PLAN_ENCODING_TABLE
- GS_WLM_PLAN_OPERATOR_INFO
- GS_WLM_USER_RESOURCE_HISTORY
- PG_AGGREGATE
- PG_AM
- PG_AMOP
- PG_AMPROC
- PG_APP_WORKLOADGROUP_MAPPING
- PG_ATTRDEF
- PG_ATTRIBUTE
- PG_AUTHID
- PG_AUTH_HISTORY
- PG_AUTH_MEMBERS
- PG_CAST
- PG_CLASS
- PG_COLLATION
- PG_CONSTRAINT
- PG_CONVERSION
- PG_DATABASE
- PG_DB_ROLE_SETTING
- PG_DEFAULT_ACL
- PG_DEPEND
- PG_DESCRIPTION
- PG_DIRECTORY
- PG_ENUM
- PG_EXTENSION
- PG_EXTENSION_DATA_SOURCE
- PG_FOREIGN_DATA_WRAPPER
- PG_FOREIGN_SERVER
- PG_FOREIGN_TABLE
- PG_INDEX
- PG_INHERITS
- PG_JOB
- PG_JOB_PROC
- PG_LANGUAGE
- PG_LARGEOBJECT
- PG_LARGEOBJECT_METADATA
- PG_NAMESPACE
- PG_OBJECT
- PG_OPCLASS
- PG_OPERATOR
- PG_OPFAMILY
- PG_PARTITION
- PG_PLTEMPLATE
- PG_PROC
- PG_RANGE
- PG_RESOURCE_POOL
- PG_REWRITE
- PG_RLSPOLICY
- PG_SECLABEL
- PG_SHDEPEND
- PG_SHDESCRIPTION
- PG_SHSECLABEL
- PG_STATISTIC
- PG_STATISTIC_EXT
- PG_TABLESPACE
- PG_TRIGGER
- PG_TS_CONFIG
- PG_TS_CONFIG_MAP
- PG_TS_DICT
- PG_TS_PARSER
- PG_TS_TEMPLATE
- PG_TYPE
- PG_USER_MAPPING
- PG_USER_STATUS
- PG_WORKLOAD_GROUP
- PLAN_TABLE_DATA
- STATEMENT_HISTORY
- System Views
- GS_SESSION_CPU_STATISTICS
- GS_SESSION_MEMORY_STATISTICS
- GS_SQL_COUNT
- GS_WLM_OPERATOR_HISTORY
- GS_WLM_OPERATOR_STATISTICS
- GS_WLM_PLAN_OPERATOR_HISTORY
- GS_WLM_REBUILD_USER_RESOURCE_POOL
- GS_WLM_RESOURCE_POOL
- GS_WLM_SESSION_HISTORY
- GS_WLM_SESSION_INFO_ALL
- GS_WLM_USER_INFO
- GS_WLM_SESSION_STATISTICS
- GS_STAT_SESSION_CU
- MPP_TABLES
- PG_AVAILABLE_EXTENSION_VERSIONS
- PG_AVAILABLE_EXTENSIONS
- PG_CURSORS
- PG_EXT_STATS
- PG_GET_INVALID_BACKENDS
- PG_GET_SENDERS_CATCHUP_TIME
- PG_GROUP
- PG_GTT_RELSTATS
- PG_GTT_STATS
- PG_GTT_ATTACHED_PIDS
- PG_INDEXES
- PG_LOCKS
- PG_MATVIEWS
- PG_NODE_ENV
- PG_OS_THREADS
- PG_PREPARED_STATEMENTS
- PG_PREPARED_XACTS
- PG_REPLICATION_SLOTS
- PG_RLSPOLICIES
- PG_ROLES
- PG_RULES
- PG_SECLABELS
- PG_SESSION_WLMSTAT
- PG_SESSION_IOSTAT
- PG_SETTINGS
- PG_SHADOW
- PG_STATS
- PG_STAT_ACTIVITY
- PG_STAT_ALL_INDEXES
- PG_STAT_ALL_TABLES
- PG_STAT_BAD_BLOCK
- PG_STAT_BGWRITER
- PG_STAT_DATABASE
- PG_STAT_DATABASE_CONFLICTS
- PG_STAT_USER_FUNCTIONS
- PG_STAT_USER_INDEXES
- PG_STAT_USER_TABLES
- PG_STAT_REPLICATION
- PG_STAT_SYS_INDEXES
- PG_STAT_SYS_TABLES
- PG_STAT_XACT_ALL_TABLES
- PG_STAT_XACT_SYS_TABLES
- PG_STAT_XACT_USER_FUNCTIONS
- PG_STAT_XACT_USER_TABLES
- PG_STATIO_ALL_INDEXES
- PG_STATIO_ALL_SEQUENCES
- PG_STATIO_ALL_TABLES
- PG_STATIO_SYS_INDEXES
- PG_STATIO_SYS_SEQUENCES
- PG_STATIO_SYS_TABLES
- PG_STATIO_USER_INDEXES
- PG_STATIO_USER_SEQUENCES
- PG_STATIO_USER_TABLES
- PG_THREAD_WAIT_STATUS
- PG_TABLES
- PG_TDE_INFO
- PG_TIMEZONE_NAMES
- PG_TOTAL_USER_RESOURCE_INFO
- PG_USER
- PG_USER_MAPPINGS
- PG_VIEWS
- PG_WLM_STATISTICS
- PLAN_TABLE
- GS_FILE_STAT
- GS_OS_RUN_INFO
- GS_REDO_STAT
- GS_SESSION_MEMORY
- GS_SESSION_MEMORY_DETAIL
- GS_SESSION_STAT
- GS_SESSION_TIME
- GS_THREAD_MEMORY_DETAIL
- GS_TOTAL_MEMORY_DETAIL
- PG_TIMEZONE_ABBREVS
- PG_TOTAL_USER_RESOURCE_INFO_OID
- PG_VARIABLE_INFO
- GS_INSTANCE_TIME
- Functions and Operators
- Logical Operators
- Comparison Operators
- Character Processing Functions and Operators
- Binary String Functions and Operators
- Bit String Functions and Operators
- Mode Matching Operators
- Mathematical Functions and Operators
- Date and Time Processing Functions and Operators
- Type Conversion Functions
- Geometric Functions and Operators
- Network Address Functions and Operators
- Text Search Functions and Operators
- JSON Functions
- SEQUENCE Functions
- Array Functions and Operators
- Range Functions and Operators
- Aggregate Functions
- Window Functions
- Security Functions
- Encrypted Equality Functions
- Set Returning Functions
- Conditional Expression Functions
- System Information Functions
- System Administration Functions
- Statistics Information Functions
- Trigger Functions
- Global Temporary Table Functions
- AI Feature Functions
- Other System Functions
- Supported Data Types
- SQL Syntax
- ABORT
- ALTER DATABASE
- ALTER DATA SOURCE
- ALTER DEFAULT PRIVILEGES
- ALTER DIRECTORY
- ALTER FOREIGN TABLE
- ALTER FUNCTION
- ALTER GROUP
- ALTER INDEX
- ALTER LARGE OBJECT
- ALTER MATERIALIZED VIEW
- ALTER ROLE
- ALTER ROW LEVEL SECURITY POLICY
- ALTER RULE
- ALTER SCHEMA
- ALTER SEQUENCE
- ALTER SERVER
- ALTER SESSION
- ALTER SYNONYM
- ALTER SYSTEM KILL SESSION
- ALTER SYSTEM SET
- ALTER TABLE
- ALTER TABLE PARTITION
- ALTER TABLESPACE
- ALTER TEXT SEARCH CONFIGURATION
- ALTER TEXT SEARCH DICTIONARY
- ALTER TRIGGER
- ALTER TYPE
- ALTER USER
- ALTER USER MAPPING
- ALTER VIEW
- ANALYZE | ANALYSE
- BEGIN
- CALL
- CHECKPOINT
- CLOSE
- CLUSTER
- COMMENT
- COMMIT | END
- COMMIT PREPARED
- COPY
- CREATE CLIENT MASTER KEY
- CREATE COLUMN ENCRYPTION KEY
- CREATE DATABASE
- CREATE DATA SOURCE
- CREATE DIRECTORY
- CREATE FOREIGN TABLE
- CREATE FUNCTION
- CREATE GROUP
- CREATE INDEX
- CREATE MATERIALIZED VIEW
- CREATE ROW LEVEL SECURITY POLICY
- CREATE PROCEDURE
- CREATE ROLE
- CREATE RULE
- CREATE SCHEMA
- CREATE SEQUENCE
- CREATE SERVER
- CREATE SYNONYM
- CREATE TABLE
- CREATE TABLE AS
- CREATE TABLE PARTITION
- CREATE TABLESPACE
- CREATE TEXT SEARCH CONFIGURATION
- CREATE TEXT SEARCH DICTIONARY
- CREATE TRIGGER
- CREATE TYPE
- CREATE USER
- CREATE USER MAPPING
- CREATE VIEW
- CURSOR
- DEALLOCATE
- DECLARE
- DELETE
- DO
- DROP CLIENT MASTER KEY
- DROP COLUMN ENCRYPTION KEY
- DROP DATABASE
- DROP DATA SOURCE
- DROP DIRECTORY
- DROP FOREIGN TABLE
- DROP FUNCTION
- DROP GROUP
- DROP INDEX
- DROP MATERIALIZED VIEW
- DROP OWNED
- DROP ROW LEVEL SECURITY POLICY
- DROP PROCEDURE
- DROP ROLE
- DROP RULE
- DROP SCHEMA
- DROP SEQUENCE
- DROP SERVER
- DROP SYNONYM
- DROP TABLE
- DROP TABLESPACE
- DROP TEXT SEARCH CONFIGURATION
- DROP TEXT SEARCH DICTIONARY
- DROP TRIGGER
- DROP TYPE
- DROP USER
- DROP USER MAPPING
- DROP VIEW
- EXECUTE
- EXPLAIN
- EXPLAIN PLAN
- FETCH
- GRANT
- INSERT
- LOCK
- MOVE
- MERGE INTO
- PREPARE
- PREPARE TRANSACTION
- REASSIGN OWNED
- REFRESH MATERIALIZED VIEW
- REINDEX
- RELEASE SAVEPOINT
- RESET
- REVOKE
- ROLLBACK
- ROLLBACK PREPARED
- ROLLBACK TO SAVEPOINT
- SAVEPOINT
- SELECT
- SELECT INTO
- SET
- SET CONSTRAINTS
- SET ROLE
- SET SESSION AUTHORIZATION
- SET TRANSACTION
- SHOW
- SHUTDOW
- START TRANSACTION
- TRUNCATE
- UPDATE
- VACUUM
- VALUES
- GUC Parameters
- GUC Parameter Usage
- File Location
- Connection and Authentication
- Resource Consumption
- Parallel Import
- Write Ahead Log
- HA Replication
- Memory Table
- Query Planning
- Error Reporting and Logging
- Alarm Detection
- Statistics During the Database Running
- Load Management
- Automatic Vacuuming
- Default Settings of Client Connection
- Lock Management
- Version and Platform Compatibility
- Faut Tolerance
- Connection Pool Parameters
- MogDB Transaction
- Developer Options
- Auditing
- Upgrade Parameters
- Miscellaneous Parameters
- Wait Events
- Query
- System Performance Snapshot
- Equality Query in a Fully-encrypted Database
- Global Temporary Table
- Appendix
- DBE_PERF
- DBE_PERF Overview
- OS
- Instance
- Memory
- File
- Object
- STAT_USER_TABLES
- SUMMARY_STAT_USER_TABLES
- GLOBAL_STAT_USER_TABLES
- STAT_USER_INDEXES
- SUMMARY_STAT_USER_INDEXES
- GLOBAL_STAT_USER_INDEXES
- STAT_SYS_TABLES
- SUMMARY_STAT_SYS_TABLES
- GLOBAL_STAT_SYS_TABLES
- STAT_SYS_INDEXES
- SUMMARY_STAT_SYS_INDEXES
- GLOBAL_STAT_SYS_INDEXES
- STAT_ALL_TABLES
- SUMMARY_STAT_ALL_TABLES
- GLOBAL_STAT_ALL_TABLES
- STAT_ALL_INDEXES
- SUMMARY_STAT_ALL_INDEXES
- GLOBAL_STAT_ALL_INDEXES
- STAT_DATABASE
- SUMMARY_STAT_DATABASE
- GLOBAL_STAT_DATABASE
- STAT_DATABASE_CONFLICTS
- SUMMARY_STAT_DATABASE_CONFLICTS
- GLOBAL_STAT_DATABASE_CONFLICTS
- STAT_XACT_ALL_TABLES
- SUMMARY_STAT_XACT_ALL_TABLES
- GLOBAL_STAT_XACT_ALL_TABLES
- STAT_XACT_SYS_TABLES
- SUMMARY_STAT_XACT_SYS_TABLES
- GLOBAL_STAT_XACT_SYS_TABLES
- STAT_XACT_USER_TABLES
- SUMMARY_STAT_XACT_USER_TABLES
- GLOBAL_STAT_XACT_USER_TABLES
- STAT_XACT_USER_FUNCTIONS
- SUMMARY_STAT_XACT_USER_FUNCTIONS
- GLOBAL_STAT_XACT_USER_FUNCTIONS
- STAT_BAD_BLOCK
- SUMMARY_STAT_BAD_BLOCK
- GLOBAL_STAT_BAD_BLOCK
- STAT_USER_FUNCTIONS
- SUMMARY_STAT_USER_FUNCTIONS
- GLOBAL_STAT_USER_FUNCTIONS
- Workload
- Session/Thread
- SESSION_STAT
- GLOBAL_SESSION_STAT
- SESSION_TIME
- GLOBAL_SESSION_TIME
- SESSION_MEMORY
- GLOBAL_SESSION_MEMORY
- SESSION_MEMORY_DETAIL
- GLOBAL_SESSION_MEMORY_DETAIL
- SESSION_STAT_ACTIVITY
- GLOBAL_SESSION_STAT_ACTIVITY
- THREAD_WAIT_STATUS
- GLOBAL_THREAD_WAIT_STATUS
- LOCAL_THREADPOOL_STATUS
- GLOBAL_THREADPOOL_STATUS
- SESSION_CPU_RUNTIME
- SESSION_MEMORY_RUNTIME
- STATEMENT_IOSTAT_COMPLEX_RUNTIME
- Transaction
- Query
- STATEMENT
- SUMMARY_STATEMENT
- STATEMENT_COUNT
- GLOBAL_STATEMENT_COUNT
- SUMMARY_STATEMENT_COUNT
- GLOBAL_STATEMENT_COMPLEX_HISTORY
- GLOBAL_STATEMENT_COMPLEX_HISTORY_TABLE
- GLOBAL_STATEMENT_COMPLEX_RUNTIME
- STATEMENT_RESPONSETIME_PERCENTILE
- STATEMENT_USER_COMPLEX_HISTORY
- STATEMENT_COMPLEX_RUNTIME
- STATEMENT_COMPLEX_HISTORY_TABLE
- STATEMENT_COMPLEX_HISTORY
- STATEMENT_WLMSTAT_COMPLEX_RUNTIME
- STATEMENT_HISTORY
- Cache/IO
- STATIO_USER_TABLES
- SUMMARY_STATIO_USER_TABLES
- GLOBAL_STATIO_USER_TABLES
- STATIO_USER_INDEXES
- SUMMARY_STATIO_USER_INDEXES
- GLOBAL_STATIO_USER_INDEXES
- STATIO_USER_SEQUENCES
- SUMMARY_STATIO_USER_SEQUENCES
- GLOBAL_STATIO_USER_SEQUENCES
- STATIO_SYS_TABLES
- SUMMARY_STATIO_SYS_TABLES
- GLOBAL_STATIO_SYS_TABLES
- STATIO_SYS_INDEXES
- SUMMARY_STATIO_SYS_INDEXES
- GLOBAL_STATIO_SYS_INDEXES
- STATIO_SYS_SEQUENCES
- SUMMARY_STATIO_SYS_SEQUENCES
- GLOBAL_STATIO_SYS_SEQUENCES
- STATIO_ALL_TABLES
- SUMMARY_STATIO_ALL_TABLES
- GLOBAL_STATIO_ALL_TABLES
- STATIO_ALL_INDEXES
- SUMMARY_STATIO_ALL_INDEXES
- GLOBAL_STATIO_ALL_INDEXES
- STATIO_ALL_SEQUENCES
- SUMMARY_STATIO_ALL_SEQUENCES
- GLOBAL_STATIO_ALL_SEQUENCES
- GLOBAL_STAT_DB_CU
- GLOBAL_STAT_SESSION_CU
- Utility
- REPLICATION_STAT
- GLOBAL_REPLICATION_STAT
- REPLICATION_SLOTS
- GLOBAL_REPLICATION_SLOTS
- BGWRITER_STAT
- GLOBAL_BGWRITER_STAT
- GLOBAL_CKPT_STATUS
- GLOBAL_DOUBLE_WRITE_STATUS
- GLOBAL_PAGEWRITER_STATUS
- GLOBAL_RECORD_RESET_TIME
- GLOBAL_REDO_STATUS
- GLOBAL_RECOVERY_STATUS
- CLASS_VITAL_INFO
- USER_LOGIN
- SUMMARY_USER_LOGIN
- GLOBAL_GET_BGWRITER_STATUS
- Lock
- Wait Events
- Configuration
- Operator
- Workload Manager
- Global Plancache
- Appendix
- Error Code Reference
- Description of SQL Error Codes
- Third-Party Library Error Codes
- GAUSS-00001 - GAUSS-00100
- GAUSS-00101 - GAUSS-00200
- GAUSS 00201 - GAUSS 00300
- GAUSS 00301 - GAUSS 00400
- GAUSS 00401 - GAUSS 00500
- GAUSS 00501 - GAUSS 00600
- GAUSS 00601 - GAUSS 00700
- GAUSS 00701 - GAUSS 00800
- GAUSS 00801 - GAUSS 00900
- GAUSS 00901 - GAUSS 01000
- GAUSS 01001 - GAUSS 01100
- GAUSS 01101 - GAUSS 01200
- GAUSS 01201 - GAUSS 01300
- GAUSS 01301 - GAUSS 01400
- GAUSS 01401 - GAUSS 01500
- GAUSS 01501 - GAUSS 01600
- GAUSS 01601 - GAUSS 01700
- GAUSS 01701 - GAUSS 01800
- GAUSS 01801 - GAUSS 01900
- GAUSS 01901 - GAUSS 02000
- GAUSS 02001 - GAUSS 02100
- GAUSS 02101 - GAUSS 02200
- GAUSS 02201 - GAUSS 02300
- GAUSS 02301 - GAUSS 02400
- GAUSS 02401 - GAUSS 02500
- GAUSS 02501 - GAUSS 02600
- GAUSS 02601 - GAUSS 02700
- GAUSS 02701 - GAUSS 02800
- GAUSS 02801 - GAUSS 02900
- GAUSS 02901 - GAUSS 03000
- GAUSS 03001 - GAUSS 03100
- GAUSS 03101 - GAUSS 03200
- GAUSS 03201 - GAUSS 03300
- GAUSS 03301 - GAUSS 03400
- GAUSS 03401 - GAUSS 03500
- GAUSS 03501 - GAUSS 03600
- GAUSS 03601 - GAUSS 03700
- GAUSS 03701 - GAUSS 03800
- GAUSS 03801 - GAUSS 03900
- GAUSS 03901 - GAUSS 04000
- GAUSS 04001 - GAUSS 04100
- GAUSS 04101 - GAUSS 04200
- GAUSS 04201 - GAUSS 04300
- GAUSS 04301 - GAUSS 04400
- GAUSS 04401 - GAUSS 04500
- GAUSS 04501 - GAUSS 04600
- GAUSS 04601 - GAUSS 04700
- GAUSS 04701 - GAUSS 04800
- GAUSS 04801 - GAUSS 04900
- GAUSS 04901 - GAUSS 05000
- GAUSS 05001 - GAUSS 05100
- GAUSS 05101 - GAUSS 05200
- GAUSS 05201 - GAUSS 05300
- GAUSS 05301 - GAUSS 05400
- GAUSS 05401 - GAUSS 05500
- GAUSS 05501 - GAUSS 05600
- GAUSS 05601 - GAUSS 05700
- GAUSS 05701 - GAUSS 05800
- GAUSS 05801 - GAUSS 05900
- GAUSS 05901 - GAUSS 06000
- GAUSS 06001 - GAUSS 06100
- GAUSS 06101 - GAUSS 06200
- GAUSS 06201 - GAUSS 06300
- GAUSS 06301 - GAUSS 06400
- GAUSS 06401 - GAUSS 06500
- GAUSS 06501 - GAUSS 06600
- GAUSS 06601 - GAUSS 06700
- GAUSS 06701 - GAUSS 06800
- GAUSS 06801 - GAUSS 06900
- GAUSS 06901 - GAUSS 07000
- GAUSS 07001 - GAUSS 07100
- GAUSS 07101 - GAUSS 07200
- GAUSS 07201 - GAUSS 07300
- GAUSS 07301 - GAUSS 07400
- GAUSS 07401 - GAUSS 07480
- GAUSS 50000 - GAUSS 50999
- GAUSS 51000 - GAUSS 51999
- GAUSS 52000 - GAUSS 52999
- GAUSS 53000 - GAUSS 53699
- System Catalogs and System Views
- Glossary
MogHA Management
Overview
MogHA is an enterprise HA product developed based on MogDB by EnMotech. It is mainly designed for server crash, instance crash, and other issues. MogHA is able to decrease the database fault time from the minute level to the second level, thereby ensuring continuous running of system services. During the fault recovery, the customers are insensitive to the process.
With MogHA, if a server crashes in the scenario where one primary server and one standby server are deployed or one primary server and multiple standby servers are deployed, the customer is allowed to manually or automatically perform primary/standby switchover to make the standby server take over services from the primary server. Therefore, the database downtime is shortened, avoiding impacting services.
Basic concepts
-
Primary/standby
Primary/standby indicates that the primary and standby instances do not share data files but own their independent data files. The primary and standby servers support data synchronization through data operation logs.
Both read and write operations can be allowed to perform on a primary server. However, only read operations can be performed on a standby server. The standby server can ensure that the data delay will not exceed a specified time range (Typically, the latest data transaction) through operation log playback.
-
Physical replication
The database supports physical replication. It indicates that redo logs are used to record data block changes. This ensures that data files on the primary and standby servers are consistent, thereby protecting data to the utmost.
-
Logical replication
Logical replication involves logical operations. It indicates that the data on the primary and standby servers is the same but data files are different.
Compared with physical replication, logical replication is more flexible.
-
Database switchover (take a single HA architecture as an example)
The main HA architecture is as follows.
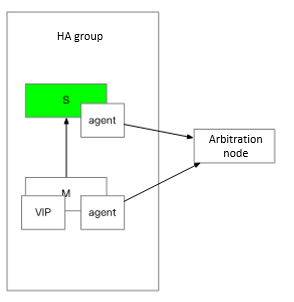
One HA group includes one primary database and one standby database. The main components include:
- Agent: Each server is deployed with an agent for performing HA-related operations.
- VIP: is short for virtual IP address. This function is provided by a vNIC that can be attached to a server. If a server crashes, the vNIC can be attached to another server. This prevents an application from modifying database configurations, reducing the database downtime. The VIP is mainly used for primary/standby switchover.
- Arbitration: In consideration of simplified configurations, the gateway of the service subnet in which the primary or standby database is located is designed as the arbitration node used as criteria for network isolation. When the standby database judges whether the primary database can be pinged, it also judges whether the arbitration node can be pinged. If the arbitration node cannot be pinged, the standby database thinks that network disconnection occurs, and then will not trigger primary/standby switchover.
-
Deployment mode
MogHA supports two deployment modes, including Lite mode and Full mode.
Lite mode
- The HA service is enabled on only the primary database server and the synchronous standby database server that are in the same equipment room.
- Single switchover is supported only.
- Manual operations are required after switchover.
- The user needs to configure a new standby database server for synchronous replication of data by setting sync names.
- The new standby database server needs to have the HA service enabled.
- No any change will be required for database configurations.
Full mode
- The HA service needs to be enabled on all instances.
-
If the standby database server crashes, the asynchronous standby database server is automatically switched as the synchronous standby database server.
- Continuous switchover is supported without manual intervention.
-
HA-related configurations of databases will be changed. (The asynchronous standby database server is automatically switched as the synchronous standby database server.)
-
Deployment and O&M
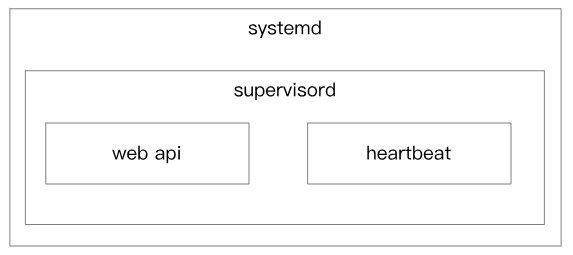
MogHA manages services through systemd while systemd manages the web and heartbeat processes through supervosord.
Web process is used for internal communications of components (mutual access is allowed within only one set of primary and standby database servers). Heartbeat process is used for actual check and HA operations.
Topology
MogHA supports the deployment mode of a maximum of one primary and eight standby database servers. The following will take the architecture of one primary and six standby database servers as an example.
The two-city-three-center architecture includes one primary database server, two synchronous standbys, three asynchronous standbys, and one cascaded standby. It can ensure that there are at least two database nodes in one data center. Real-time data synchronization between servers in two equipment rooms in the same city can prevent data loss or service unavailability due to single equipment room failure. The remote equipment room is used for disaster recovery and provides multiple data copies. The cluster architecture is as follows.
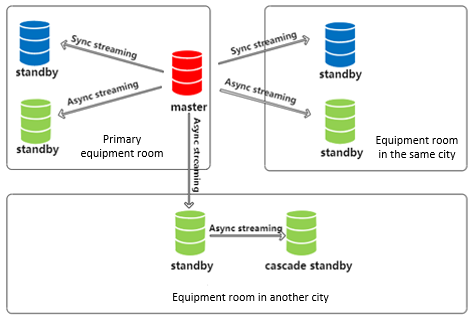
Three database servers are deployed in the primary equipment room, including one primary database server, one synchronous standby, and one asynchronous standby. The synchronous standby and asynchronous standby are connected to the primary database server in the upstream. When data is changed on the primary database server, the commit operation is performed only after the data change is saved to the disk of the synchronous standby. Compared with the synchronous standby, the asynchronous standby allows certain delay of writing data to a disk. If the primary database server goes wrong, the data of the synchronous standby and the primary database server is consistent. The synchronous standby is preferentially chosen as the primary database server without data loss. When the original primary database server cannot be recovered quickly, the synchronization configuration parameter synchronous_standby_names needs to be modified on the new primary database server and the reloading is also required to switch the asynchronous standby to a synchronous standby. This ensures that there are two synchronous standbys in the whole cluster and there are two database servers in each equipment room.
The HA tool monitors the status of all nodes in a cluster. If a primary database node is abnormal, a standby database node can take over services from the primary database node, making sure that the whole database cluster is available. With the JDBC-related IP address list, the program can automatically determine which one is the primary database node and which one is the standby database node without application intervention.
Deployment and Installation
Prerequisites
-
The database has been deployed.
-
The OS must be based on x86 Red Flag 7.6.
-
Python 3 has been installed.
Procedure
-
Ensure that the firewall is disabled. The actual environment can be set by port.
-
Use NTP or chronyd to proof the time of the primary and standby database servers.
-
Configure the sudo permission for the user.
chmod +w /etc/sudoers which ifconfig /usr/sbin/ifconfig vi /etc/sudoers omm ALL=(ALL) NOPASSWD: /usr/sbin/ifconfig chmod -w /etc/sudoers -
Prepare the Python running environment.
Create soft links to python and python3 in the /home/omm/ha/venv/bin directory.
ln -s /usr/bin/python3.7 /home/omm/ha/venv/bin/python ln -s /usr/bin/python3.7 /home/omm/ha/venv/bin/python3 -
Modify configuration files.
a. Modify the postgresql.conf configuration file in the data directory, and modify the listening addresses as required.
listen_addresses=’*’b. In the postgresql.conf configuration file of each node, change replconninfo1 and its subsequent ports to 26009, 26008, 26007, 26009, 26008, and 26007, and then restart the database cluster.
c. Add the IP address for accessing the server to the pg_hba.conf file.
For example: host all all 21.0.21.23/32 md5
d. Put ha and venv in the /home/omm/ha directory.
/home/omm/ha/ha/node.conf
                env.sh
                supervisord.conf
                mogha.service
/home/omm/ha/venv/bin/python
                      python3
/usr/lib/systemd/system/mogha.service
e. Modify the node.conf configuration file in the /home/omm/ha/ha directory.
[config]
heartbeat_interval=3                                 #HA heartbeat interval(s)
primary_lost_timeout=10                              #Maximum time(s) for the loss of the primary database node
primary_lonely_timeout=10                            #Maximum time(s) of the primary database node disconnected from other nodes
double_primary_timeout=10                            #Maximum time of maintaining two primary database nodes
agent_port=8081                                      #Web port of HA
db_port=26000                                         #Database service port
db_user=omm                                          #OS user of the database
db_datadir=/data/dn1                                 #Data directory
primary_info=/home/omm/ha/ha/primary_info.json     #JSON data address of the primary database node, which is put in the HA directory by default
standby_info=/home/omm/ha/ha/standby_info.json     #JSON data address of the standby database node, which is put in the HA directory by default
taskset=True
[meta]                                          #Metadatabase
ha_name=ms1
host=192.168.2.1
port=26000
db=monitordb
user=monitor
password=monitor
schema=public
[host1]                                            #Information of node 1, generally referring to the primary database node
ip=192.168.122.201
heartbeat_ips=192.168.100.201
[host2]                                            #Information of node 2
ip=192.168.122.202
heartbeat_ips=192.168.100.202
[host3]                                             #Information of node 3
ip=192.168.122.205
heartbeat_ips=192.168.100.205
[host4]                                             #Information of node 4
ip=192.168.122.206
heartbeat_ips=192.168.100.206
[zone1]                                            #Primary equipment room
vip=192.168.122.211
arping=192.168.122.1
ping_list=192.168.122.1
hosts=host1,host2
[zone2]                                             #Standby equipment room
vip=192.168.122.212
arping=192.168.122.1
ping_list=192.168.122.1
hosts=host3
cascades=host4                                      #Cascaded database
f. Modify the env.sh configuration file in the /home/omm/ha/ha directory.
export GAUSSHOME=/home/postgres/openGauss
export PGDATA=$GAUSSHOME/data
export LD_LIBRARY_PATH=$GAUSSHOME/lib
g. Modify the supervisord.conf configuration file in the /home/omm/ha/ha directory.
[supervisord]
logfile=/tmp/mogha_supervisord.log ;The log file is $CWD/supervisord.log by default.
logfile_maxbytes=50MB        ;If the log file size is greater than the upper limit, data will be written to a new log file. The default maximum size of a log file is 50 MB. If this parameter is set to 0, the log size is not limited.
logfile_backups=10           ;The default number of log file copies is 10. The number is set to 0, indicating that there is no copy.
loglevel=info                ;The log level is info by default. Other values include debug, warn, and trace.
pidfile=/tmp/mogha_supervisord.pid ;pid file

nodaemon=true               ;Check whether the node is started in the foreground. The default value is false, indicating that the node is started in the daemon mode.
minfds=1024                  ;Indicates the minimum number of the files that can be opened. The default value is 1024.
minprocs=200                 ;Indicates the minimum number of the processes that can be opened. The default value is 200.
[program:web]
command=/home/omm/ha/venv/bin/python  /home/omm/ha/ha/main.py --config /home/omm/ha/ha/node.conf --web
autostart=true
startsecs=10
autorestart=true
startretries=3
user=omm
redirect_stderr=true
stdout_logfile_maxbytes=20MB
stdout_logfile_backups = 20
stdout_logfile=/home/omm/ha/ha/mogha_web.log
environment=PYTHONUNBUFFERED=1,GAUSSHOME=/opt/gaussdb/app,PGDATA=/opt/gaussdb/data/db1,LD_LIBRARY_PATH=/opt/gaussdb/app/lib:/opt/mogdb/tools/lib:/opt/mogdb/tools/script/gspylib/clib
directory=/home/omm/ha/ha/
[program:heartbeat]
command=/home/omm/ha/venv/bin/python  /home/omm/ha/ha/main.py --config /home/omm/ha/ha/node.conf --heartbeat
autostart=true
startsecs=10
autorestart=true
startretries=3
user=omm
redirect_stderr=true
stdout_logfile_maxbytes=20MB
stdout_logfile_backups = 20
stdout_logfile=/home/omm/ha/ha/mogha_heartbeat.log
environment=GAUSSHOME=/opt/gaussdb/app,PGDATA=/opt/gaussdb/data/db1,LD_LIBRARY_PATH=/opt/gaussdb/app/lib:/opt/mogdb/tools/lib:/opt/mogdb/tools/script/gspylib/clib
directory=/home/omm/ha/ha
h. Modify the mogha.service configuration file in the /home/omm/ha/ha directory.
[Unit]
Description=The doufu python message queue server
After=network.target remote-fs.target nss-lookup.target

[Service]
Environment=GAUSSHOME=/gauss/openGauss/app_101
Environment=PGDATA=/gaussdata/openGauss/db1
Environment=LD_LIBRARY_PATH=/gauss/openGauss/app_101/lib:/gauss/openGauss/om/lib:/gauss/openGauss/om/script/gspylib/clib:
Type=simple
User=omm
WorkingDirectory=/home/omm/ha/ha
ExecStart=/home/omm/ha/venv/bin/supervisord -c /home/omm/ha/ha/supervisord.conf
KillSignal=SIGTERM
TimeoutStopSec=5
KillMode=process
PrivateTmp=false
[Install]
WantedBy=multi-user.target
i. Copy the mogha.service configuration file to the /usr/lib/systemd/system/ directory as user root.
-
Enable/Disable MogHA.
a. Run the following commands on all nodes as user root:
su - root
systemctl [start|stop|restart] mogha
b. Check whether the log file of each node is correct.
tail -f /home/omm/ha/ha/mogha_web.log
tail -f /home/omm/ha/ha/mogha_heartbeat.log
c. Set the HA service enabled upon server startup.
su - root
systemctl enable mogha
MogHA Uninstallation
Procedure
-
Log in to each database node as user omm.
-
Delete the venv and ha files on each node.
-
Switch to use root.
-
Delete the mogha.service file on each node.