- About MogDB Stack
- Quick Start
- Installation
- Tutorial
- Architecture
- References
- Client
- mgo
- mgo create
- mgo create mgorole
- mgo create mgouser
- mgo create cluster
- mgo show
- mgo show k8s
- mgo show mgorole
- mgo show mgouser
- mgo show cluster
- mgo show restore
- mgo delete
- mgo delete mgorole
- mgo delete mgouser
- mgo delete cluster
- mgo delete backup
- mgo delete k8s
- mgo scale
- mgo scaledown
- mgo switch
- mgo update
- mgo update mgorole
- mgo update mgouser
- mgo update cluster
- mgo version
- mgo addk8s
- mgo localk8s
- mgo backup
- mgo backup detail
- mgo restore
- mgo minio
- mgo minio object
- mgo minio object ls
- mgo minio object stat
- mgo minio object getf
- Server
- Client
- FAQ
- Release Note
High Availability
Overview
Note: Unlike the sidecar mode in version 1.0, HA is running in sentinel mode since version 2.0.
Why we do this:
1.Preparing for cross-room scenarios;
2.When running as sidecar, the database needs to be restarted in certain scenarios of database failure, causing the MogDB process to become a sub-process of the HA process;
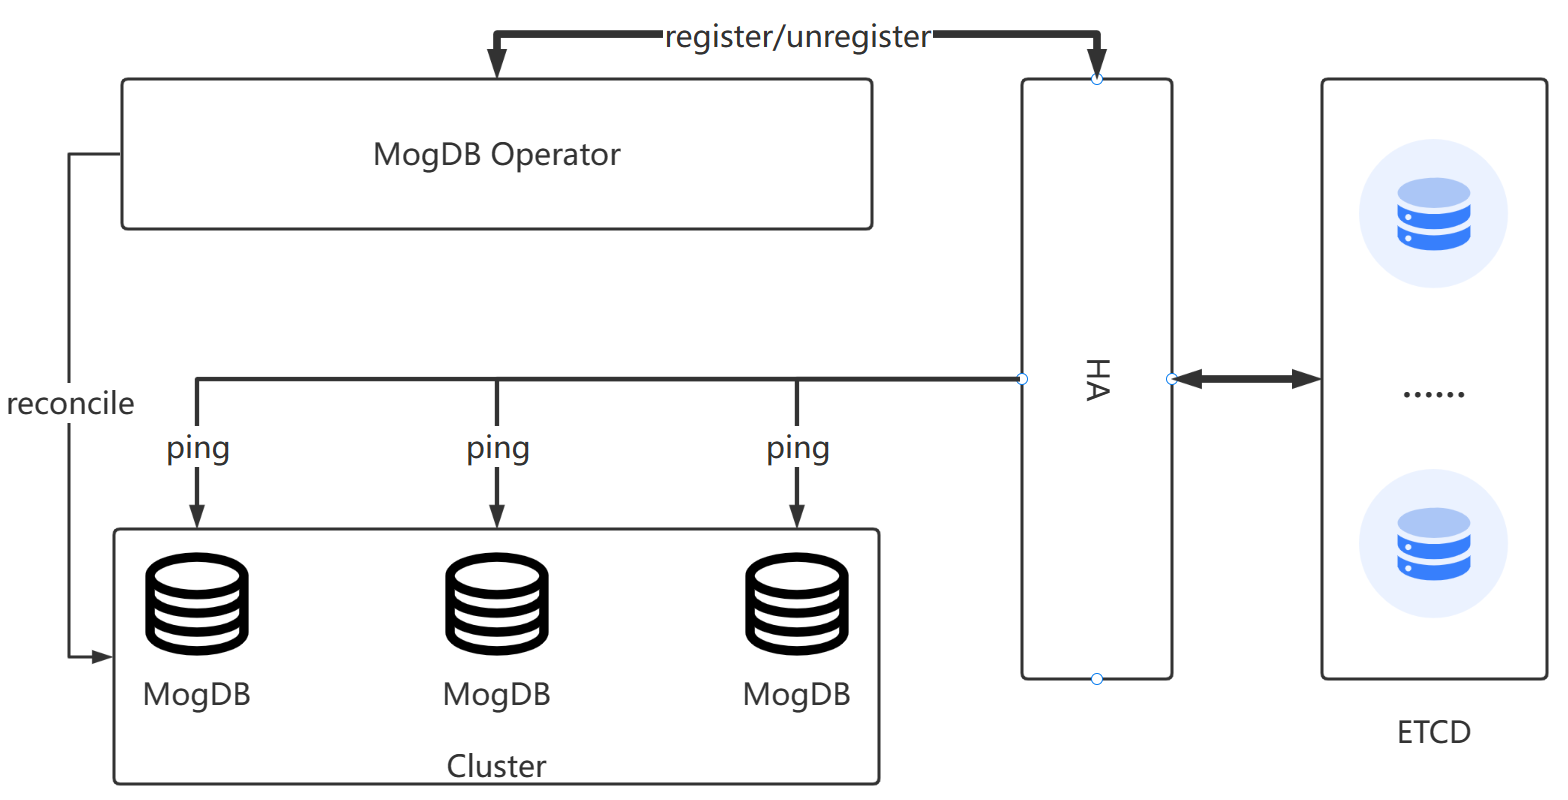
High Availability is a functional component of the MogDB Stack architecture that runs in sentinel mode and monitors the operational status of the MogDB cluster in real time, triggering repair logic when a cluster failure is monitored.
Scenarios where switching occurs include:
- Rack power down
- Primary database network unreachable
- Database failure down
- Database disk failure or some hardware failure
Enable High Availability Component
HA itself uses dcs to guarantee high availability, currently only etcd is supported, so you need to prepare a high availability etcd cluster and configure the connection information into HA when starting the component.
1.Prerequisites
- Installed kustomize v3+;
- Installed MogDB Operator;
- Prepare a high availability etcd cluster if you need to formally start a HA component, rather than perform a high availability experience;
2.Get the installer
Fork the MogDB Stack examples repository on GitHub:
https://github.com/enmotech/mogdb-stack-examples/fork
After the fork repository, you can download it locally with a command like the following.
YOUR_GITHUB_UN="<your GitHub username>"
git clone --depth 1 "git@github.com:${YOUR_GITHUB_UN}/mogdb-stack-examples.git"
cd mogdb-stack-examples
3.Deploy HA Component
The HA component installation directory is located in the kustomize/mogha directory in the installation package.
Special Note: By default we use the easy installation mode, where etcd is deployed in the same pod as ha to experience the component services. To officially use this component, please note that you should follow the instructions in the kustomization.yaml file to comment out the patches/deployment-container-etcd.yaml line and modify the patches/deployment-container-mogha.yaml file to pass the high availability etcd cluster connection information you have prepared, which also allows you to pass other parameters, see parameter list.
After ensuring that you have edited the HA component parameters, the following command will deploy the HA component:
kustomize build kustomize/mogha | kubectl apply -f -Expected output:
namespace/mogha created
serviceaccount/mogdb-ha created
clusterrole.rbac.authorization.k8s.io/mogdb-ha-role created
clusterrolebinding.rbac.authorization.k8s.io/mogdb-ha-rolebinding created
service/mogdb-ha created
deployment.apps/mogdb-ha created
4.Check the Installation
The HA component is installed in the mogha namespace by default:
kubectl get pods,svc -n moghaExpected output:
NAME                            READY   STATUS    RESTARTS   AGE
pod/mogdb-ha-55cdbc7855-xfb8g   2/2     Running   0          44s

NAME               TYPE        CLUSTER-IP      EXTERNAL-IP   PORT(S)    AGE
service/mogdb-ha   ClusterIP   10.107.90.105   <none>        6544/TCP   44s
5.Register HA Component
After the HA component is successfully deployed, you need to register it to MogDB Operator in order to use the functions of the HA component normally.
In 4.Check the Installation, we get the endpoints of the mogdb-ha service and now register it to the MogDB Operator, which is installed in the mogdb-operator-system namespace by default:
kubectl edit configmap mogdb-operator-global-config -n mogdb-operator-systemAfter that, modify the haServices section in .data.config.json, fill in the endpoints, and save it to exit.
tips:
In kubernetes, we generally do not recommend using cluster-ip:port because cluster-ip is not a fixed value. We recommend using kubernetes domain name resolution, where the service endpoints follow the structure
http://namespace.service-name.kubernetes-domain-name.在本例中,namespace 为 mogha,service-name 为 mogdb-ha,kubernetes-domain-name 为 svc.cluster.local,因此 endpoints 为
http://mogha.mogdb-ha.svc.cluster.local:6544。In this example, namespace is mogha, service-name is mogdb-ha, kubernetes-domain-name is svc.cluster.local, so endpoints is
http://mogha.mogdb-ha.svc.cluster.local:6544.
6.Use of HA component
If the MogDB cluster is later created to use the HA component, you will need to configure .spec.enableHa to true in the MogDB manifest.
...
sepc:
  enableHa: true
...
Parameter List
| Parameter | Description | Type | Default value |
|---|---|---|---|
| debug | Whether to enable debug mode | Boolean | true |
| etcd-key | The base path to use when storing related information | String | "mogha" |
| etcd-username | the user to connect to the etcd cluster | String | "" |
| etcd-password | the password to connect to the etcd cluster | String | "" |
| etcd-endpoints | the IP address to connect to the etcd cluster | String | "127.0.0.1:2379" |
| etcd-dial-timeout | the timeout to connect to etcd cluster | Integer | 5 |
| observe-period | Detection interval of mogdb cluster | Integer | 60 |
| db-probe-period | Interval to detect if a single mogdb node is healthy | Integer | 5 |
| db-probe-failure-threshold | Threshold for the number of probes to determine exceptions for a single mogdb node | Integer | 3 |
| mogdb-username | The user who connects to the mogdb cluster, normally not specified | String | operator built-in admin user |
| mogdb-password | The password to connect to the mogdb cluster, normally not specified | String | operator built-in admin user |