Installation and Deployment
Downloading an Installation Package
Visit Release Notes to download the installation package of the required platform.
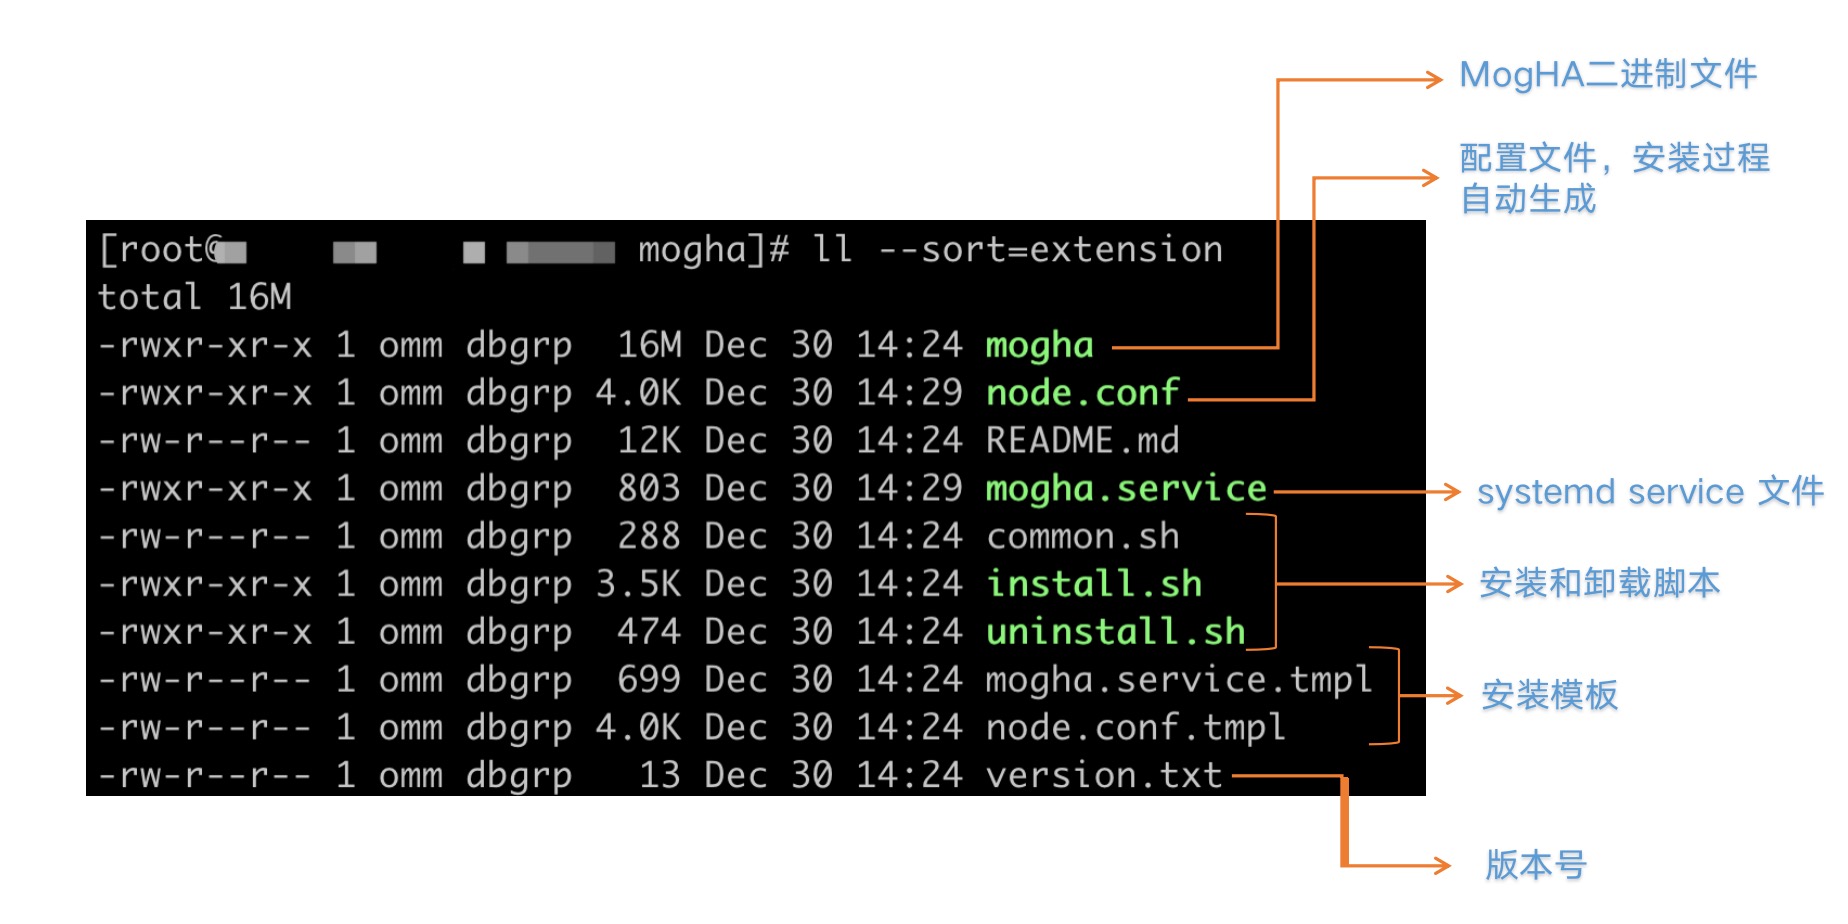
Description of Files in an Installation Package
System Environment Requirements
Verifying that gsql and gs_ctl Are Run Without the Password Requirement
Ensure that a password is not required for running gsql or gs_ctl when you log in to a server as the database installation user. You can find the pg_hba.conf authentication file in the data directory to verify that the verification mode of local connection is trust.
Verification method: switch to user omm and run the following command to check the cluster status. (If you can query the cluster status without entering a password, the verification is successful.)
gs_ctl -D [PGDATA] queryGranting the Sudo Permission to the Database Installation User
Because a virtual IP needs to be automatically attached to MogHA, the ifconfig command is used for NIC-related operations. MogHA is enabled by the database installation user. To operate with a NIC, the database installation user needs to have the sudo permission. During installation, the script will check whether the user permission is configured in /etc/sudoers. If the user permission is configured, skip the configuration. If not, the script will try to automatically add the omm user to /etc/sudoers and grant the user the ifconfig permission. Therefore, it is recommended to verify whether the user is granted the sudo permission by checking /etc/sudoers.
The configuration method is as follows:
# Add the following content to the end of the file.
omm     ALL=(ALL)       NOPASSWD: /usr/sbin/ifconfig
Configuring MogHA Communication Port
MogHA requires a fixed port (default: 8081 which can be modified through the agent_port parameter) for MogHA communication between nodes. Therefore, you need to ensure that the port can be directly accessed between different nodes.
Correcting the Time
Use ntp or chronyd to correct the time of the primary and standby instances.
Installation Procedure
! Notice: Please perform installation as the
rootuser because the database installation user needs to be granted the sudo permission and the system service needs to be registered.
Copy the installation package to a server where MogHA is to be deployed. It is recommended to use the /opt or /home/[USER] directory as the directory for storing the installation package, such as /home/omm/. The following procedure will use this directory to introduce how to perform the installation.
Decompress the Installation Package
cd /home/omm
tar -zxf mogha-2.x.x.tar.gz
After the installation package is decompressed, a mogha folder will be obtained in the current directory.
Install the MogHA Service
Open the mogha folder and execute the sudo ./install.sh USER PGDATA [SERVICE_NAME] installation script (You need to configure related parameters in the actual installation).
USERindicates the database installation user, such asommin this example.PGDATAindicates the data directory of the database, such as/opt/mogdb/datain this example.- (Optional)
SERVICE_NAMEindicates the service name when systemd is registered. The default value is mogha.
The following example shows the installation process (if an error occurs during the installation, the subsequent installation will be stopped):
# Open the mogha folder.
cd /home/omm/mogha
# Execute the installation script.
sudo./install.sh omm /opt/mogdb/data

# During the installation, information similar to the following is returned:
[2021-11-24 16:20:00]: MogHA installation directory: /home/omm/mogha
[2021-11-24 16:20:00]: Database installation user: omm; user group: dbgrp
[2021-11-24 16:20:00]: Data directory of the database: /opt/mogdb/data
[2021-11-24 16:20:00]: LD_LIBRARY_PATH=/opt/mogdb/app/lib:/opt/mogdb/tool/lib:
[2021-11-24 16:20:01]: GAUSSHOME=/opt/mogdb/app
[2021-11-24 16:20:01]: Database port: 26000
[2021-11-24 16:20:01]: Current system architecture: aarch64
[2021-11-24 16:20:01]: Modify the installation directory and its subdirectories or the user and user group of the file...
[2021-11-24 16:20:01]: Generate the mogha.service file...
[2021-11-24 16:20:01]: Copy the mogha.service file to /usr/lib/systemd/system/
[2021-11-24 16:20:01]: Reload the configuration file
[2021-11-24 16:20:01]: MogHA service registered successfully
[2021-11-24 16:20:01]: Sudo permission of the user omm configured in the /etc/sudoers file.
[2021-11-24 16:20:01]: Permission configured successfully!
NOPASSWD:/usr/bin/systemctl,NOPASSWD:/usr/sbin/ifconfig
[2021-11-24 16:20:01]: node.conf already exists and will not automatically generate.
[2021-11-24 16:20:01]: MogHA installation succeed!

Modify the /home/omm/mogha/node.conf configuration file and then start the service!

The MogHA service can be managed using the systemctl tool.
    Start MogHA: sudo systemctl start mogha
    Stop MogHA: sudo systemctl stop mogha
    Restart MogHA: sudo systemctl restart mogha
    Uninstall MogHA: sudo ./uninstall.sh mogha
The installation script output shows the installation process. A successful installation must contains "MogHA installation succeed!". For other situations, you need to check which installation procedure fails to perform.
If the installation script is successfully executed, there are one new file generated.
- node.conf: HA configuration file (if this file exists, it will not be generated.) requires completion of host and zone information by yourself.
Complete node.conf Configuration
After the installation script is executed, you are not advised to start the MogHA service immediately. You need to complete the configuration file and then start the MogHA service.
During the first installation, node.conf does not exist. The script will generate a node.conf configuration file according to the node.conf.tmpl template file. After obtaining this file, you need to complete your host and zone configuration information according to the configuration file.
Manage the MogHA Service
After node.conf is configured, you can manage the HA service through systemctl.
If SERVICE_NAME is specified during execution of the installation script, the service name needs to be replaced with the customized service name in the follow-up operations.
Starting the MogHA Service
sudo systemctl start moghaChecking the MogHA Service Status
sudo systemctl status mogha
● mogha.service - MogHA High Available Service
   Loaded: loaded (/usr/lib/systemd/system/mogha.service; disabled; vendor preset: disabled)
   Active: active (running) since Thu 2021-11-18 22:48:51 CST; 5 days ago
     Docs: https://docs.mogdb.io/zh/mogha/v2.0/installation-and-depolyment
 Main PID: 193849 (mogha-2.2.3-dev)
    Tasks: 55
   Memory: 1.5G
   CGroup: /system.slice/mogha.service
           ├─ 193849 /home/omm/mogha/mogha-2.3.0-aarch64 -c /home/omm/mogha/node.conf
           ├─ 193862 mogha: watchdog
           ├─ 193863 mogha: http-server
           └─ 193864 mogha: heartbeat
Setting MogHA that Is Enabled Upon Server Startup
sudo systemctl enable moghaRestarting the MogHA Service
sudo systemctl restart moghaStoping the MogHA Service
sudo systemctl stop moghaUninstalling MogHA
Open the installation directory and execute the uninstallation script.
cd /home/omm/mogha
sudo ./uninstall.sh
Log Files
MogHA will generate two log files.
- mogha_heartbeat.log
This log file is stored in the installation directory, such as /home/omm/mogha in this example. It records HA heartbeat logs and is a main log for fault analysis.
- mogha_web.log
This log file stores the same directory as the heartbeat log. It records web request logs.